Sunday, February 27, 2011

Masking Unmasked

Masking Unmasked
Masks are ways that you can change up your layout and give it a little fade effect that will make the whole layout pop! This is a really easy technique to learn. You can use masks for many many things, but it seems that they are widely used with papers and photos. When you learn how to mask, you are also learning a way to non-destructively edit your photos. By that, I mean that you are able to restore your image back to the way it was originally. I also find that masks are much easier to use than working with the eraser tool, and by far, the quickest! Here are a couple of ways to try out masks for your layouts. 

Basic Clipping Mask:
  1. Open your photo in PSE or PS.
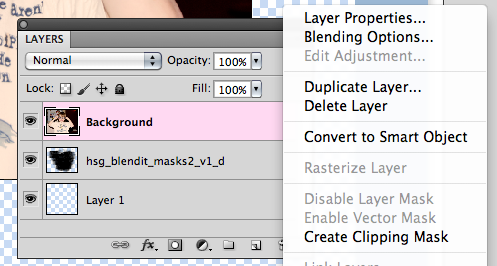
  2. Start a New Document, by Right Clicking and Duplicating your photo in a New or Untitled file. Save.
  3. Select the photo mask you wish to use, and open it in PSE or PS.
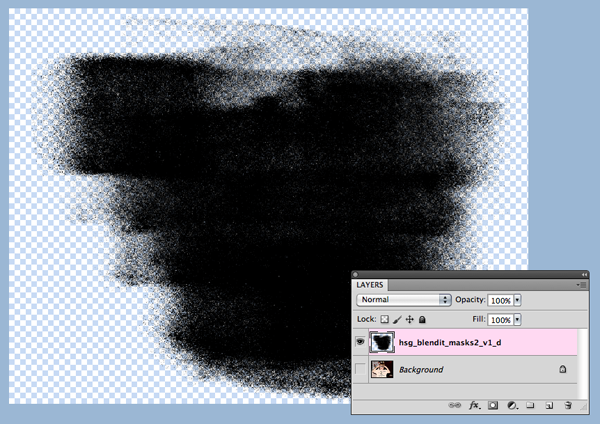
  4. Drag the photo onto the photo mask so that it is the layer above the photo mask.
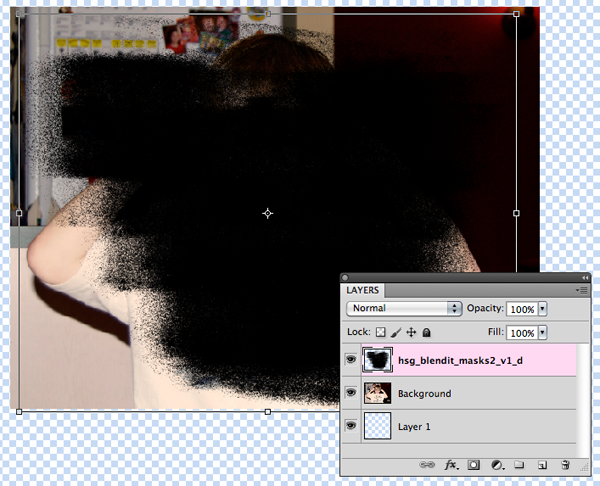
  5. Right click and select CreateClipping Mask or Ctrl+G (Mac: Cmd+G) to clip it together.
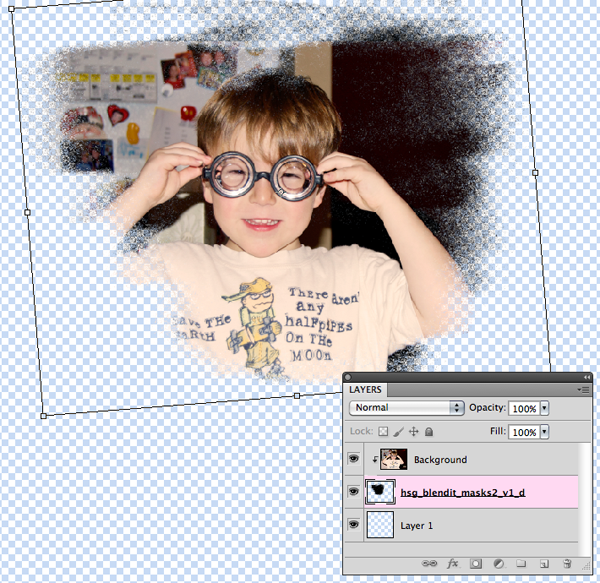
  6. To use it in a layout, select the Layer and right click, choose Merge Visible.
  7. Drag or Duplicate the photo onto your layout
Tip: If your background layer is locked, double click on it and re-name it. This will un-lock the layer.
Tip: Change the opacity of the brush in the layers to show or hide more of your photo. 

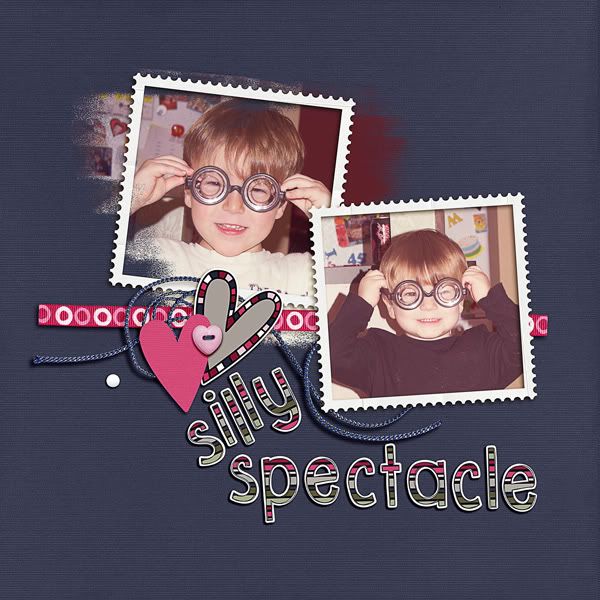
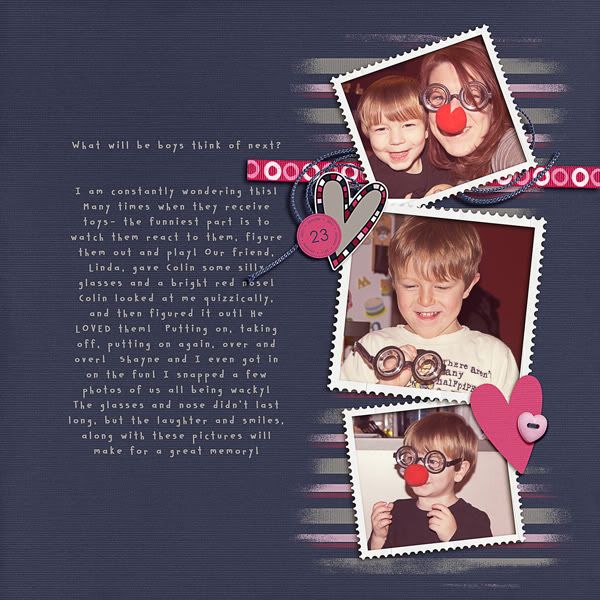
Here is a layout that I made that shows off the versatility of clipping masks and how they can be changed for different looks. In my example, I used Jennifer Labre's Love Me Do (Link:  http://shop.scrapmatters.com/product...tid=7677&cat=6, Happy Scrap Girl's, Blend It Masks 2 (Link: http://shop.scrapmatters.com/product...6&cat=0&page=1) as well as Happy Scrap Girl's Ultimate Date Material (Link: http://shop.scrapmatters.com/product...7&cat=0&page=1. On the Left side of the double, I masked my photo, a nice effect and makes the pictures similar but different. On the right side of the spread, you can see faded stripes under the photos. That is the mask with a paper clipped to it! I adjusted the opacity down, and then changed the blending mode to "Lighten" ti give it a different effect. Such a simple change, and it really makes for fun masking! Try it out!



Fading Gradient Mask:
  1. Open your photo in PSE or PS.
  2. Start a New Document, by Right Clicking and Duplicating your photo in a New or Untitled file. Save.
  3. Within the Layers Palette, click on the "Mask" icon at the bottom of the palette. This will add a layer mask, which you can see next to my photo. This fade is essentially a white/black fade mask. White allows the picture to show through, while black will hide the picture. Grey areas will affect how transparent (aka opacity) of the picture.
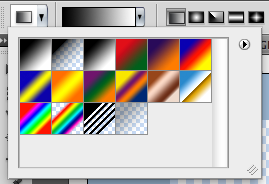
  4. Go to the Toolbars, and use the Gradient Tool.

  5. Click on your layer mask in the Layers Palette, so you know you are going to create your mask in the correct location.
  6. Click on the bottom of your picture in the middle and hold your mouse. Now, drag the cursor upward. Stop where you want the fade to end. Let the mouse button go. A faded layer mask - complete.
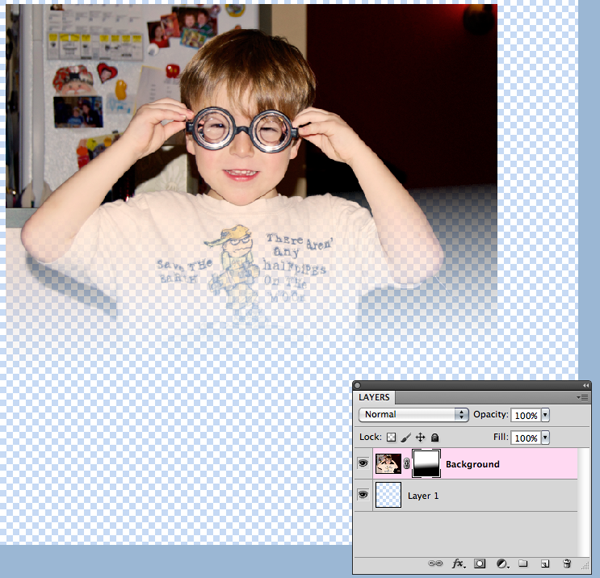
Tip: Set your foreground color to black (that is the one on top).
Tip: Hold the Shift key to make your cursor move in a straight line.


Brush Masks:
  1. Open your photo in PSE or PS.
  2. Start a new document by right clicking and duplicating your photo to a new or Untitled file. Save.
  3. Within the Layers Palette, add a new layer. (This new layer should be above your photo).
  4. Click on Layer in the Menubar, then choose New Fill Layer. Choose Solid Color, and then OK.
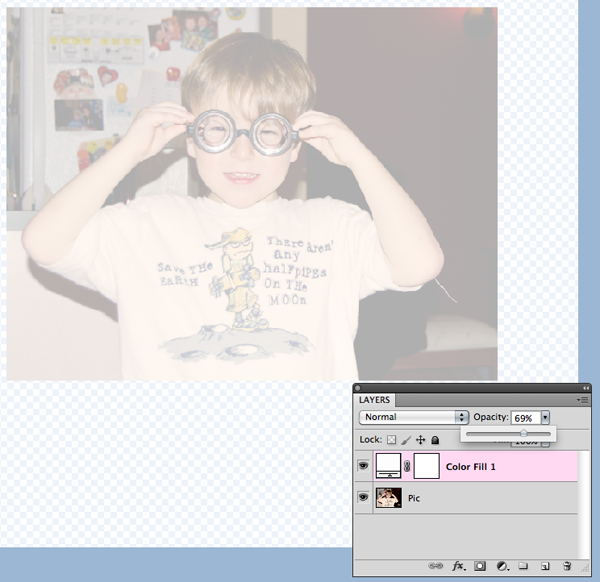
  5. Lower the Fill Layer's opacity until you can see the photo underneath.
  6. Choose the Brush Tool and select a soft, round brush from the menu.
  7. Choose black as the Foreground Color.
  8. Select the Mask on the Fill Layer -- this is the second square. Start painting in a zig zag or scribbly motion.
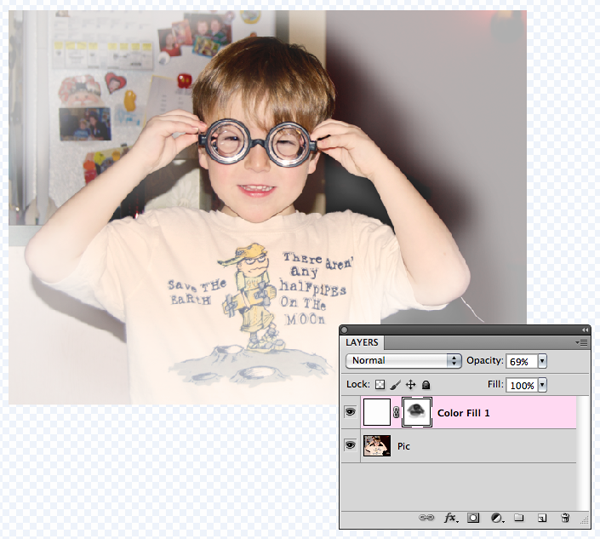
Tip: In the above example, you were looking at a white filled layer above your photo. Fill with different colors that may complement your photo. 
Tip: Before Brushing, change the opacity, and try out different amounts.

Texture Tip for Photoshop Users:
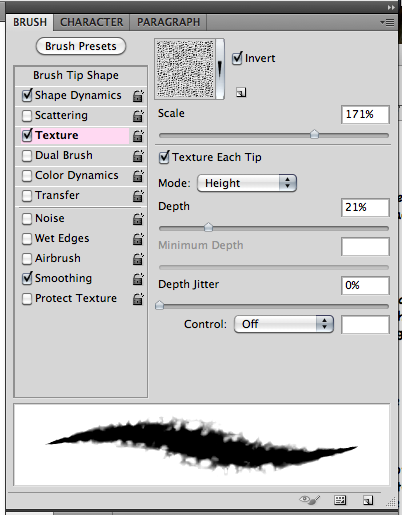
Click on the Brush Palette Tab, then click on the word Texture. Adjust the texture scale and depth to give a slight texture to the brush, according to your taste. Pictured here is Wrinkles texture on default options.Try out different textures and lay with the scales, depths, and Blending Mode to see what you can come up with. 
This image shows a faint change in the texture on the mask. A bit of texture can change up any image. Cool tool! 
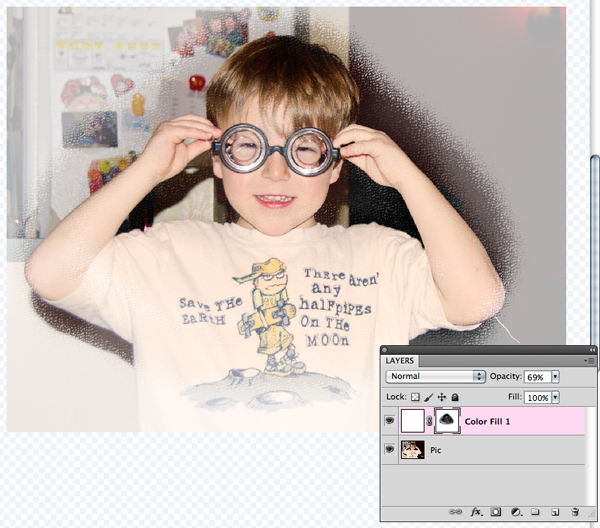

Now that you know a little bit more about masking and different techniques, try it out! Remember to duplicate your photos and save the files as you work! Play with the opacity, different blend modes for textures and the color fills. You might just have found a new favorite technique to try on your layouts! Have fun!


I originally created this tutorial for the ScrapMatters Newsletter for February.  Sign up to the ScrapMatters Newsletter (more like a 20 page magazine) and get more tutorials like this, fun freebies, and great articles: HERE!

Thanks for visiting.... 
Jenn (jk703)

Thursday, February 24, 2011

C'mon, Check Out My Meatballs!

Meatballs!  Besides calling my kids that, I love to eat them!  I hope you do too - cause that is my meal to share today!  An easy family favorite... 

Crock Pot Meatballs!

You will need (the winded version):
Frozen Meatballs!  I choose to use Turkey meatballs...and I made 96 meatballs. 
Red Spagetti Sauce - homemade sauce or bottled sauce will do! 
Diced Veggies -  approx. 2-3 cups - onions, mushrooms, squash, zucchini, green pepper, carrots, or any others that you might like. 
McCormack Grinders Italian Seasoning
Optional:  Cheese, Garlic (Powder, Salt, or even Fresh... add if you like)

1. Plop the meatballs in your crock pot....set to Low Temperature. I have a 96 piece bag!
2. Add either your own sauce or any other sauce you like, approx. 32-48 oz.  I tend to use about half of the number of meatballs! For today, since I have 96 meatballs, I used approx. 48 oz. of sauce. Here is a pic as I am adding the sauce in... Turkey Meatballs are sooo yummy!
3. Add the diced veggies.  I've added onion, green pepper, mushrooms - they are very small because I try to hide them from my kids!  LOL!
4. Stir it all together; coat meatballs and veggies well. 
5. Sprinkle some garlic salt or garlic powder, or even a fresh clove of garlic. 
6. Grind the McCormack Grinders Italian Seasonings.  I used about a 1/2 tsp for my large amount. Stir. 

Cook for  4-6 hours on low. Remember to check your meatballs at 4, 5, and 6 hours depending on your crock pot and temperature settings.  Here are mine after a good stir and 6 hours of cooking... 
Now at the end... you have some choices for your dinner. You could boil some pasta and serve the meatballs over.  Just toss the cooked pasta in with the meatballs and serve... OR you could do what we did and make mini Meatball Hoagies!  My boys love them, and they are yummy!  Sprinkle the cheese goodies on top if you like... We didn't tonight, but it is my fav topping!


This big batch is perfect for lunch later in the week or a second meal one night! Easily freezes too!  Hope you've enjoyed it!  

Thanks for visiting!  If you have any recipes that you are looking for a fast version for, let me know -- I love a good challenge!  Have a great Monday!

Originally created and posted by me for Jennifer Fox Designs: Here!
Jenn
(jk703)

Tuesday, February 22, 2011

Healing Tool: Operation Mustard REMOVAL!

Hi Everyone! 


I am sure that there are photos of friends, kids, or even you with food on your face! Well, today I am going to touch on the Healing Tool and we can remove those food spots, as well as cuts, acne or even lighten skin! Such a cool tool, and my best friend if I have a blemish on my face! OK! Here is the Tool (such a cute little bandaid, right?!): 

Here is a picture of my son, Shayne, eating a pretzel with mustard when we visited Touch a Truck day late last year! Now, I know you are thinking... where is the mustard... it is there, and it bothered me, so this was a great example of removing the "food blemish!" lol! 
This close up shows that it is there, and it is actually in a few places: left corner, left spot on his cheek, right bottom smudge, and there is a small cut on his nose and cheek. He's my cute slob! :)

The healing brush is used remove blemishes. It gathers information from the immediate surrounding area that we are altering and then it will blend it to make the changes smooth and very unnoticeable - if done correctly.

To make things more beneficial, we need to use the right kind of brush. If you have the brush set at a high hardness, the changes that you make will show. I normally use a hardness and spacing of 20%, the size will change as you work so there is not a set size for this. Please know, it will take time to experiment with these settings, these are just what I find most effective. For this example, I adjusted my hardness a bit higher. 
You may notice that my brush size is pretty small. When fixing blemishes, you will want to zoom in pretty close to make the best changes. The small brush size is effective at that level of closeness.

This is the 
Healing Brush Tool menu bar:


Mode Specifies the blending mode. Choose Replace to preserve noise, film grain, and texture at the edges of the brush stroke when using a soft‑edge brush.
Proximity Match Uses pixels around the edge of the selection to find an area to use as a patch.

Create Texture Uses pixels in the selection to create a texture. If the texture doesn’t work, try dragging through the area a second time.
Content-Aware Compares nearby image content to seamlessly fill the selection, realistically maintaining key details such as shadows and object edges.


This is the 
Spot Healing Brush Tool menu bar:


Mode Specifies the blending mode. Choose Replace to preserve noise, film grain, and texture at the edges of the brush stroke when using a soft‑edge brush.
Source Specifies the source to use for repairing pixels. Sampled to use pixels from the current image, or Pattern to use pixels from a pattern. If you chose Pattern, select a pattern from the Pattern pop‑up panel.
Aligned Samples pixels continuously, without losing the current sampling point, even if you release the mouse button. Deselect Aligned to continue to use the sampled pixels from the initial sampling point each time you stop and resume painting.
Sample Samples data from the layers you specify. To sample from the active layer and visible layers below it, choose Current And Below. To sample only from the active layer, choose Current Layer. To sample from all visible layers, choose All Layers. To sample from all visible layers except adjustment layers, choose All Layers and click the Ignore Adjustment Layers icon to the right of the Sample pop‑up menu.
Removing Blemishes
So, here are some steps to removing blemishes and other unwanted marks on your photos!

Open up your photo, and create a duplicate of the original so that if you don't like the changes, you still have the original to go back to!

  1. Choose the Healing Tool, and note that the Background layer should be the active layer. 
  2. Zoom in close to the area that you will be working on. 
  3. Move your cursor NEXT to the blemish, to a nearby "Clean" location. 
  4. Press the Alt Key (Option for Mac) and hold it. Click with your left mouse button. You will see something similar to a bullseye when you do this part. You now have a made a sample that you will use to cover the blemish.
  5. Next, you start clicking on the blemish to change/fix it. 
  6. Re-sample often and near to the blemish -- it will appear smooth, and doesn't look blotchy when you continue to re-sample. 
  7. Sometimes, changing the opacity helps in making the changes seem more realistic. 
For this example, I left my tool in the Normal mode. If it was a dark spot, I might choose lighten, or if it were a light spot, I might choose darken. Play around with the options, and find your style!

Here is the Before and After of my Mustard Mouth! 


There you have it... a quick and easy blemish fix! I hope you learned something, and I would  LOVE to see what you were able to remove from your photos!  

This post was created by me originally for Jennifer Fox Designs: HERE!

Jenn
(jk703)

Monday, February 21, 2011

Nicknames and Me...Days 19 and 20 and a late addition of Day 21!

Hello... Hello... I may be behind on this bloggity challenge, but I will complete it!  :)  I've am about two thirds of my way through... so I will keep plugging along!  I'm at the day where I get to share my nicknames and a picture of me... I should just post like 10 pictures of me.... bwahahahaha!  That might be a little odd!  After this I've got some Mustard Removal ready to go... so don't forget to check that out... a fun little tutorial featuring my older DS, Shayne!


Day 19 -- Nicknames...

There are lots!  Lot's I tell ya... but mainly if I had to choose one it would be... dun dun dun daaaaa... Jenn.  Wow, right?  you couldn't have guessed that one, huh?!  Lets see what else I remember...

My parents called me The Wedge when I was a kid.  I am an only child, and would always be in between them... laying down on the bed, at the movies, wherever... so The Wedge was born.

Dad calls me "Ifer" sometimes.... because he didn't want the other half of my name to feel bad!  lol!

Gram calls me whatever name she can think of... Jeanne, Jan, Jane... oh, Jenny... I don't give her any lip... she has 8 kids and all their names start with the letter J... eventually she will get to Jenny.  BTW... DO NOT call me Jenny unless you are one of my grandmothers.  While I may not punch you, I will growl... grrrrrr...   it is reserved for them, and I don't like it really at all unless it is coming out of their mouths!

After that... well, there is one that stands out... Kennelly. It sounds like Kennelli... not Kenneeeeeelly.  lol!  It is my maiden name, and well, that was what a lot of people in college referred to me as... now that I am married... well, Kennelly remains.  Since Peter and I met in college, we have lots of the same friends... and Kennelly will live on!  lol!  I like it... it is a part of me!


Day 20... Pic of me... well, it is to the right... and i think it was taken in October 2010... nothing has changed, well... I do need to color my hair... badly... but otherwise the same!


Day 21...I'm going to squeeze this one in here too... What's in my Makeup Bag?

Well... makeup!  :)  I wear make up every day... and honestly... I look so funny with out it!  Seriously, people think I look tired or sick without makeup!  It is quite funny - plus if I don't wear my makeup... well, I really have NO eyes... they are small to begin with... and without some makeup showing them off... they are non-existent!  :)

What is in it?
Foundation, blushes, loose powder, eyeshadows, eye shadow primer, wet eyeliner, mascara, lip gloss, and more of the same. Don't forget the brushes, tweezers, and all the other doo-dads that go along with make up and application!  :)

My favorite eyeshadow is Urban Decay... Naked... LOVE... awesomesauce!  They also have an awesome eyeshadow primer... swear, it doesn't fade throughout the day... good stuffts!


Thanks for visiting! Hope you all have a great day!  Be back soon with Mustard Removal! :)
Jenn (jk703 or The Typative Scrapper)

Thursday, February 17, 2011

READ THIS! :) Another Interruption..... :)

Hi everyone... yummies are on my head since I'm cutting back... so I'm going to share a recipe with you that in my family we call it BARK!  SOOOOOO yummy.... and SOOOOO bad for you!  Do not make this if you don't plan on bringing 90% of this to a party or something!  Otherwise, you WILL sit on your tush and eat it all!  Trust me!  I'm down 2 out of my 10 and thought instead of making it and eating it, well... I'd share the love... um, spread that poundage elsewhere!  (giggling)

Quick and easy dessert.... remember -- MUST take out of your house!! LOL!

Pics aren't great untouched... but I had to share sooner than later!  You ready?!  


Chocolate Bark (That is what we call it, lol!)

1 sleeve of saltine crackers
1 stick of butter
1/2 cup light brown sugar
12 oz chocolate chips
1 cup chopped pecans
Wax Paper
Non-Stick Cooking Spray
Aluminum Foil
Flat Jelly or baking pan.

Directions:
PREHEAT oven to 400F.
Line a flat 15x10x1-inch baking pan or jelly roll pan with foil; grease foil.
Spread crackers evenly into prepared pan. (Like my son, Shayne, lol)


Place butter and sugar in saucepan. Bring to boil on medium-high heat, stirring frequently.


Reduce heat to low; boil 3 min.


Immediately spread over crackers. I use a wooden spoon to try to smooth it around and get any dry spots.


BAKE 5-7 minutes. The crackers may look like they are floating... be careful.. slip and slide crackers.


Take out and sprinkle with chocolate chips. Don't eat them.... the end is worth it!


Turn the oven OFF!
Put the cracker/buttery/chocolate heavenly mess back in the oven.  Bake for 5 minutes.
Sprinkle with walnuts.


Cover with Wax paper.
Smoosh the walnuts into the chocolate by pressing with a oven mitt or towel on the wax paper.


Cool -- freezer for an hour, fridge for a few hours, covered garage or outside if cold.
Break into pieces and just try to give it away!  :)


There are times that I don't really spread the chocolate very well... and it still comes out really good. Another thing that I have done, is when breaking up the pieces, to make it easier I've let it cool covered in the garage overnight - but if I don't have time, I cool it in the freezer.

You can change up the recipe for other yummies that you like!  I've tried white chocolate and walnuts, milk chocolate with pretzels, white chocolate with crushed candy canes and milk chocolate, butterscotch and nuts.  Double it up, and make different combinations!  Mix it up!


OH... just to make it more fattening, lol -- To make bark sandwiches, I've used fluff in the middle of two pieces... so sweet though, but kids love!

Hope that was fattening enough?!?!  I have created a new tag for some of my recipes - Fattening!  :)


LOL!  Anyway... hope you enjoyed this recipe!
Thanks for visiting!
Jenn (jk703)


Wednesday, February 16, 2011

Regrets and Something I Miss... Day 18 and Day 19

Hi everyone!!!!! I'm back to my Bloggity Blog challenge... though I do need to catch up on reading the other ladies fabulous blogs!!!!  Just a quick post to share some more random things about me!  I am on Day #18 - Regrets and Day #19 - Something I Miss.

Regrets...
I don't really think that I have any.  I do tend to think what might have been if things didn't happen the way they did... If I had to choose something, it isn't really a regret, just a "wonder what would have happened," so.....here is mine.

When I was graduating high school, I applied to colleges like everyone else.  I had my "sure things," my "reach but attainables," and then my "yeah, right!" applications.  Well, the first college that I got my reply from was Seton Hall University, here in NJ.  I was over the moon, so excited, and shocked.  My "yeah, right" school just sent me an acceptance letter!  Wow!

I am a lucky, lucky girl... spoiled brat in some ways. My grandparents were going to pay for my college tuition - so I didn't have to worry about tuition or things like that!  In my family, the grandparents have paid for the college education of the grandkids.  There aren't like crazy amounts of grandkids, so it is workable. Well, my mom told me that I wasn't able to go to Seton Hall because my grandparents wouldn't pay for it.  I was crushed, but understood.  I didn't look at another college acceptance letter. None.  I decided on a county college.  I never mentioned it again.

Years later, my grandparents were paying for my college education.  As I was chatting with my grandfather about colleg on the phone one day - by this point I had transferred to another university and was almost completed with my degree - and he asks me "Why didn't you go to Seton Hall?" I was dumbstruck, and speechless. I told him that Mom said he wouldn't have paid.  He said that wasn't the case, explained some things that my Mom got wrong, and said that maybe she had misunderstood him.  He would have paid for my schooling wherever I went. 

My only wonder what would have happened is:  What would my life have been like now - if I had gone to Seton Hall?  Not necessairily a regret, more of a wonder. I ended up transferring from County College to another NJ university, and graduating with a Degree in Psychology, as well as a Business Degree.

I do also know that this was the way it was supposed to happen -- otherwise, I wouldn't have met my wonderful husband, or had my two babies, or anything!  So... not really a regret!


Something I Miss...
Hmmmm.... really hmmmmm.... I am totally not sure!  I miss the little things --

I miss summer days, evening playing outside, warm weather and sunshine!  At least right now!  lol! I miss my grandfather, Shayne (yes, my older DS is named after him) -- and I wish he could have gotten to meet my little Shayne!  He was such a grumpy old man... but I knew just what he wanted every time I saw him!  I miss being able to go out one night and not having to worry about the kids, get a babysitter, or all that stuff!  I miss college -- it was so much FUN!  I miss hanging out with friends -- with kids and everything else, it is so difficult!  I miss my grandparents -- I still have three and they are special to me!  I miss seeing my family that lives far away... Indiana, California, and all over!  I miss so much... but it all seems so little!  I am grateful for what I have!


Be back soon... maybe with something fattening!  LOL... and I just hopped back on my cut down eating diet thingy!  :)

Have a nice night... thanks for visiting and reading my typative chattery post!
Jenn (jk703)

Sunday, February 13, 2011

Cool Camera Toy!

Oooooooh boy, have I got a cool gadget for you! 

We've all got cameras, and we use them constantly!  I take oodles and oodles of pictures!  All the time, and they total in the thousands!!  I'm sure that a lot of you are just like me!  Then, after I take all those pictures, I have to upload them to my computer so I can edit, share, or scrap them! I used to hate taking all those cords out, finding the right ones and making sure it is all connected correctly!  But then... aaaaaahhhhh... I found these little wonders:

They are called Eye-Fi Cards!  Simply, they are awesomeness that is about the size of a postage stamp!  What do they do?  Well, I take my pictures, come home, turn on my computer and turn on my camera.  The Eye-Fi card will AUTOMATICALLY transfer my images to my computer. INSTANTLY!  No cords, no connections, just instant photo upload!  

For my personal use, I upload to my computer and leave it as it.  Later, when I am sitting down and plan to work with my photos,  (I have a Mac and I run multiple photo libraries) I click on my Photo Manager and choose the correct library that I want my pictures to be saved at, and once it loads, it also loads my new pictures!  WOW, right?!  

You can choose different options for the card, as well as choosing instant uploads to other outside websites, such as Facebook, Shutterfly, Snapfish, Flikr, or one of 20 other sites!!!  Depending on the card you choose, you can do video also!  Here is a chart that shows the differences between the cards!  


If you can, go check them out!  They really are as easy as that, and make my life so much easier that I don't have to do go through the processes of uploading photos - cause all I have to do now is press a button!  

I originally created this post for Jennifer Fox Designs: HERE!

Let me know what you think!
Have a great day!
Jenn
(jk703)

Dream House... and Looking Forward: Day 16 and Day 17

Hi everyone...  Happy Sunday!  I love the weekends, and not having to go to work!  I like my job, but lately, it is just not as fun as it used to be... oh well... onto better things!  I'm back again to share with you some more chattery randomness -- but with the Bloggity Blog Challenge, I'm a little more focused, lol!

I've decided to move on and over Day 15.  Not really the chattery subject I'd like to delve into here!

Day 16 is all about my dream house... well... I have to link you up... because it was a sweepstakes house for HGTV in 2009... um, 2008, and probably every year.... :)  I love these houses, and I would gladly copy and build all of them if I had the time and money!  There definitely good and not so good to each house... but I'd make it my own!

2008....close to my heart.  Every year my family and I meet in Islamorada, FL for a vacation.  It is beautiful, warm, and friendly place!  Nothing like the Florida Keys... and this HGTV 2008 dream house was beautiful!

2009...Beautiful porches, and clean and simple lines... mmmmm!  I love the whole house, but the look is so nice! A girl can dream, right!?  HGTV 2009 dream house... 

Closer to my home, and dear to my heart, is my grandmothers home.  It makes everything seem regal, but it is a comfortable familiarity to me, so I love it!  I'm not going to share the house itself, but my favorite picture from the house... untouched.  I love it!


Day 17.... something to look forward to... well, everything! I can't pin down everything, now can I?!  ok... well, not work!  :)

I look forward to the everyday, the hanging out with my boys, sharing a snack with them -- all the little stuff!  I also look forward to the big things -- vacations, anniversaries, or other things like that... Right now, with so much winter and snow... I am looking forward to the temperatures getting warmer and spring and summer!

I am a Pollyanna at heart...


Thanks for visiting... and have a nice Sunday!  I'll be posting shortly about those fantastic Eye-Fi cards... so check that out too!
Jenn (jk703)

Thursday, February 10, 2011

Tutorial: Watermarking!

Hi Everyone! How is your week going! I hope well! Since I've started digital scrapbooking, I've noticed that I'm really getting into my cameras, photo actions and the actual editing of my pictures! I like to take different shots, fun angles, and try out the different settings on my camera!

Since we have so many photographs we are posting to show-off online, like the popular P365 challenge or a even a single picture challenge in the digital scrapping forums, there may be times that you want to protect your photographic work!  What I mean about protections is trying to disable people who might want to use them without your permission. Today, many photo sites that you are uploading your photos too also provide options for protecting your work. They offer an option to disable the "Right Click Feature" is really a helpful tool! One that is available to us, and easy to do ourselves is Watermarking!

Watermarking has it's good and bad points, but it is your decision. Here is a quick list of pros and cons.

No Watermark:
  • Watermarks sometimes are considered annoying and distracting to the image.
  • If someone wants to “steal” the image, they can likely remove the watermark anyway.
  • The image may not hold specific value and you just want to share it.
Add Watermarks:
  • A watermark is a notification that the image is protected under a copyright.
  • Watermarking is part of showing your brand.
  • If someone does take the image and forward it to someone else, they will see it and may go to your site based on your watermark.
  • There is also a notion that adding a watermark makes you appear professional. (That is more of an opinion). 
How to Add a Text Watermark in Photoshop:
Open the photo you wish to protect.
Decide on what you want to type on your image. 
Select the Type tool and enter the copyright symbol or other piece of text you decided on for your watermark. See below for HOW!  For my example, I used the font named Trubble. 


Create a New Layer above your text.

With the New Layer Selected, use the Square Marquee Tool and make an outline of your watermark-to-be.  Click Select > Inverse.

Click the Add a Layer Mask Button.


Then you will click and select the Text Layer and your Mask Layer. Both should be highlighted. Merge these two layers. 

 Change the Opacity as you like. 

Optional 
Create a New Layer UNDER your Watermark Layer. 
Use the Rectangular Marquee Tool to make another rectangle around your watermark.
Select the rectangle by clicking on the icon in the Layers Palette.
Use the Fill Tool and fill the shape with the color of your choosing.  
Lower the opacity to what you like.  

Tips:  
  • The Windows keyboard shortcut for the copyright (©) symbol is Alt+0169 (use the numeric keypad to type the numbers). The Mac shortcut is Option-G.
  • Remember to click on the Color Swatch and set the color to 50% gray or another color of your choosing. 
  • Take the time to resize and place the text where you desire. 
  • Save the watermark as it's own file or png to use it over and over again!  
Don’t feel like putting in the extra time to place your watermark on many different images? There are so many free sites and software that will allow you to “cheat", saving you a lot of time and energy. This is also a nice alternative for those who do not have Photoshop on their computer. 

This post was originally created by me for Jennifer Fox Designs: HERE!

Hope this was helpful to you!  Enjoy the upcoming weekend!
Thanks for visiting!
Jenn (jk703)