Showing posts with label Misc. Designers. Show all posts

Wednesday, April 6, 2011

Layouts... Layouts and some more Layouts.. oh... and 2 CT Calls!

Hi Everyone!  I'm always posting tutorials... so I'm going to share some recent layouts that I have done... and then 2 CT calls that you should send your apps in... RIGHT AWAY!  :)

All images are linked to my gallery.... hint, hint.... lol!  :)
First up are my layouts (that I am behind in making) for my P52 project!  It doesn't bother me that I am behind, because I have every intention of working on them... time just goes a lot faster than I can scrap!  You might have noticed that my continuous theme for this album is paper blocking.  I try to add a little color and some cute ellies to each P52 layout, and paper blocking is an easy and fun way to make it pop!  What do you think?

Week 4 Layouts, credits between the pages.  Jenn's papers are just awesome and pop off that pale BG... I love them!
Color Me Happy - Jennifer Labre Designs
Scrapping with Liz - Block Templates
Font is The Pencil by Heather Hess


Week #5 Layouts, credits between the pages.  Amy's kit was a fun flea market kit and had great little ellies with a shabby feel.  I used a photo treatment to match my pics to the kit!  Another little tidbit... see the pale, pale brush on the creme background?  That is an awesome grunge spot from Inspirations from Day... a perfect little boost to add to any BG!
Saturday Flea Market by Amy Stoffel
Grunge Smears by Inspirations By Day
"Zine" Style Templates bu Scrapping with Liz
Font is Throw My Hands Up In The Air. 

ScrapMatters introduced a fun idea in April... the Mix A Kit!  It ties all the designers together with the same palette.  You get so many things to choose from, and basically make the kit you want!  So custom made!  Here is a layout that I made with A LOT of the pieces!  :)
Credits below, and my page is linked!  :)

Spring Stitches by Inspirations by Day
Springy: The Elements by WM [squared]
Footloose and Fancy Pattern Papers by Graham Like The Cracker
Letterpress Paper Pack by Chelle’s Creations
Sprung: Little Bits by Stolen Moments Designs
Spring Punch Alpha by Jennifer Labre Designs
Spring Punch Papers 2 by Jennifer Labre Designs
Blueprints Set 3 by True Blue Studio
I love scrapping double pages... I know they will fit nicely together in my printed books, and it also allows me to use the supplies a little more!  We all have that big a stash that it makes me feel better that I've used things a couple extra times, lol!  My most recent page... I'm waiting on summer to come, so I thought I'd scrap it!  Plus, this kit is sooooo girlie... I mean, c'mon... It's A Chick Thing... .just called out a challenge to show off the masculine side of the kit!  Credits between pages.

It's a Chick Thing by Spinky Dink Scraps and Daybreak Scraps
Sweet Spring Set 2 by True Blue Studio
Font is Teletype.

Thanks for checking out my pages... remember, hint, hint... I love love!  LOL!  Up next will be some sort of tip or tutorial.... I have a couple ideas!  IF there is something that you would like to see, please share!


I almost forgot... check out these two CT calls over at ScrapMatters.... So, get those apps in... and fast!


AND...

Again... Thanks for visiting!
Jenn
(jk703/The Typative Scrapper)

Saturday, March 12, 2011

Day 26 & 27: Family, Pets and Tears

Hi Everyone!  I'm back... lol... like I'd be anywhere else!  *giggle*  So... I'm up to Day 26 and Day 27 of the 30 Day Bloggity Blog Challenge -- to which I fell off the wagon, and recently got back on!  :)

So... Day 26 is a family picture... lol... I have to go search!

Wait... Be right back...


One More Minute...


ok....


well...

The last picture that I have as a family is from last summer, lol! Didn't realize how horrible I was at getting group shots!  That sure is going to change!!!  So... I will share a family picture at least of the 4 of us, and then a layout of Peter and I... :)

As you can see... Shayne didn't want to take a picture, so he looked away at the last minute!  Oh well... lol!  Plus, don't mind me...we were away for the weekend, and were going to drive home for a nice 5 hour long trip so I hadn't done my hair or much makeup!  :)

Here is Peter and I from my cousin's wedding... with the sun in my face and my hair blowing in the wind... Oh Puleez!  lol!  The second page to this layout was with my parents... they are below Peter and I.

Delightful Day Elements and Papers by Spinky Dink Scraps
Fuss Free: Contest Series 2 by Fiddle Dee Dee Designs
Fonts are Film Cryptic and Jane Austen Fonts

I used Spinky Dink Scraps and a template from Fiddle Dee Dee Designs for this layout and it was such a cute/classy kit to work with, plus an awesome template!  Kind of like the best of both worlds!  


Next up.... well. Pets.

Hmmm.. I don't have much to say.  It is a tough one, and makes me sad still.  

I've only copied and pasted my explanation from FB to here.  I try not to dwell as I will become sad and still very upset.  Just explaining this and posting this brings tears to my eyes and that lump in my throat.  I am still unable to do the second page, even though the words below ARE the gist of the second page. 


I copied and pasted from my FB page...

The background... The will be the first page of a layout. I can't do the second page yet -- I don't have the "right" words.

Mack, my furbaby, was starting to snap at Colin, and growl if he came near. Then when we were not home, he started damaging the house, clawing at the drywall, door trims, and having accidents all over the house. We tried so many things... One afternoon, Colin was crawling around, and was near Mack, and Mack snapped at him, and almost got him.

We had to make one of the hardest and saddest decision of our life. We had to bring him to the shelter. We couldn't take any chances with our children. It made me feel like the worst person/pet owner in the world.

I will never get over him, and our situation... I can tell you my side of the story so many times, but the guilt will never go away. There are always the thoughts of "I should have done this or that"... I miss Mack so much!

Thanks for looking, and reading my novel.
I chose this odd photo because it was my favorite.


Designer Digitals:
Anna: ArtPlay Palette, Find My Way,
Katie: Web Inspiration Challenge.

Font: Scriptina


ok... deep breath... 

moving on.  


Thanks for visiting!
Jenn (aka jk703/The Typative Scrapper)
Friday, March 11, 2011

Shuffle It Up... Day 25!

Hi Everyone... a quick post here to keep myself going... :)!  


Today's post is my Ipod... shuffle up the songs, and jot down the first 10 songs... I have such a range in music that this will be interesting!  lol!  Here goes... 


1. Sugarland -- All I Want To Do... 
2. Kenny Chesney -- Better As A Memory...
3. Nickelback -- Never Going To Be Alone... 
4. K'naan & Adam Levine -- Bang Bang... 
5. Bon Jovi -- I Love This Town... 
6. Nelly -- Just a Dream...
7. Theory of a Deadman -- So Happy...
8. Toby Keith -- Get Drunk and Be Somebody...
9. Pink -- Raise Your Glass...
10. Good Charlotte -- Like It's Her Birthday... 


Country, Rock, Pop, Rap, Dance... hmmm... lots going on there!  That was fun!  


The other funny thing... I wonder why the kids songs didn't invade the first 10 -- I have Disney, They Might Be Giants, Cars, and other wonderful kid (*rolling my eyes*) tunes!  Some are ok, but boy... sometimes I have to wonder what someone was on when writing kid songs!  


Thanks for visiting!
Jenn (jk703)

Tuesday, March 8, 2011

Back on the Wagon.... Day 23 and Day 24...


Hello everyone!  I fell off my Bloggity Blog Challenge and decided it was time to climb back on the wagon!  Here I am to jabber on about my favorite vacation, Day 23 and something that I've learned, Day 24!  I took a wee break to catch up on some things, change things up in my scrappy world, and take a mini vacation!  


Day 23:  Favorite Vacation
Gosh... any vacation is a favorite!  Really!  I could vacation at home, and that would be a vacation because I didn't have to work!  LOL! 


But... to pick a recent one.  In 2010, we were lucky enough to bring the boys to Florida, and we visited Disney World, and Universal Studios!  It was a lot of fun, and the best part was that the whole family got to go - from my grandmother, my 2 uncles and their families, my mother and father, along with Peter, myself and the boys!  It was a great trip!  Here are some layouts from the trips and park visits:


Ticket to Ride by Chelle's Creations
Make a Splash by Chelle's Creations
Handwritten Summer by Karla Dudley
Font is CK Jot
Wizarding Magic at Scrapmatters
Fiddle Dee Dee Designs: Room to Breathe Set 3
Lamebrain BRK Font

Cindy's Layered Templates - Set # 81, Guest Designer December 2010 Page 2 is mirrored of Page 1.
Mye De Leon - The Magic is Here Kit
Chelle's Creations - Happy Alpha

So that is my most recent favorite vacation... but really, every vacation is a favorite!  


Day 24: What I've Learned

I've learned a lot!  Besides that actual learning you get from school and books (I've got plenty of that, and 2 degrees -- Psychology and Business with a minor in Marketing), life seems to be the best teacher for me!  Life and living, making mistakes, and being me really allow me to learn!  I've definitely grown since the teenage "I know it all" stages and enjoy learning now!  I've learned to be a multitude of things:  honest, happy, giving, open, to relax, silly, to just be me, and to love wholeheartedly!  I've learned to keep my eyes open, open my mouth, and learn from other's mistakes.  I've learned to be happy with what I have, and to keep striving to do better! In essence, I've learned a lot from books and life in general!  

Thanks for visiting!  Up next is another tutorial... just have to figure which one to post!  lol!
Jenn (jk703)

Sunday, February 27, 2011

Masking Unmasked

Masking Unmasked
Masks are ways that you can change up your layout and give it a little fade effect that will make the whole layout pop! This is a really easy technique to learn. You can use masks for many many things, but it seems that they are widely used with papers and photos. When you learn how to mask, you are also learning a way to non-destructively edit your photos. By that, I mean that you are able to restore your image back to the way it was originally. I also find that masks are much easier to use than working with the eraser tool, and by far, the quickest! Here are a couple of ways to try out masks for your layouts. 

Basic Clipping Mask:
  1. Open your photo in PSE or PS.
  2. Start a New Document, by Right Clicking and Duplicating your photo in a New or Untitled file. Save.
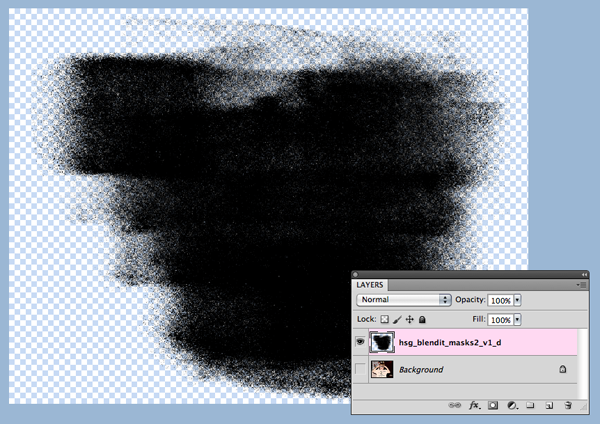
  3. Select the photo mask you wish to use, and open it in PSE or PS.
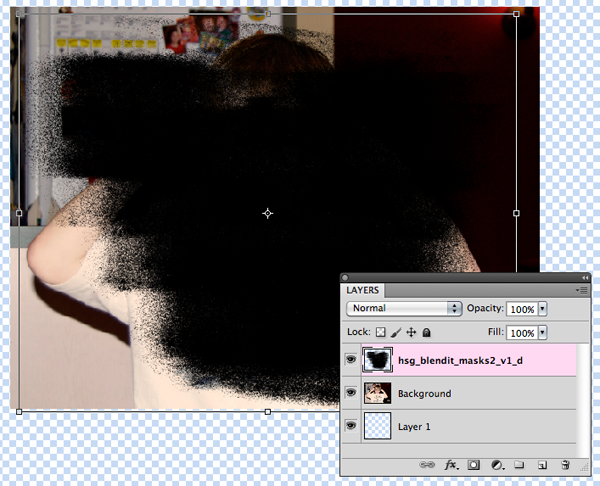
  4. Drag the photo onto the photo mask so that it is the layer above the photo mask.

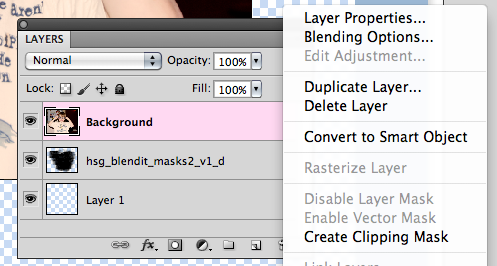
  5. Right click and select CreateClipping Mask or Ctrl+G (Mac: Cmd+G) to clip it together.
  6. To use it in a layout, select the Layer and right click, choose Merge Visible.
  7. Drag or Duplicate the photo onto your layout
Tip: If your background layer is locked, double click on it and re-name it. This will un-lock the layer.
Tip: Change the opacity of the brush in the layers to show or hide more of your photo. 

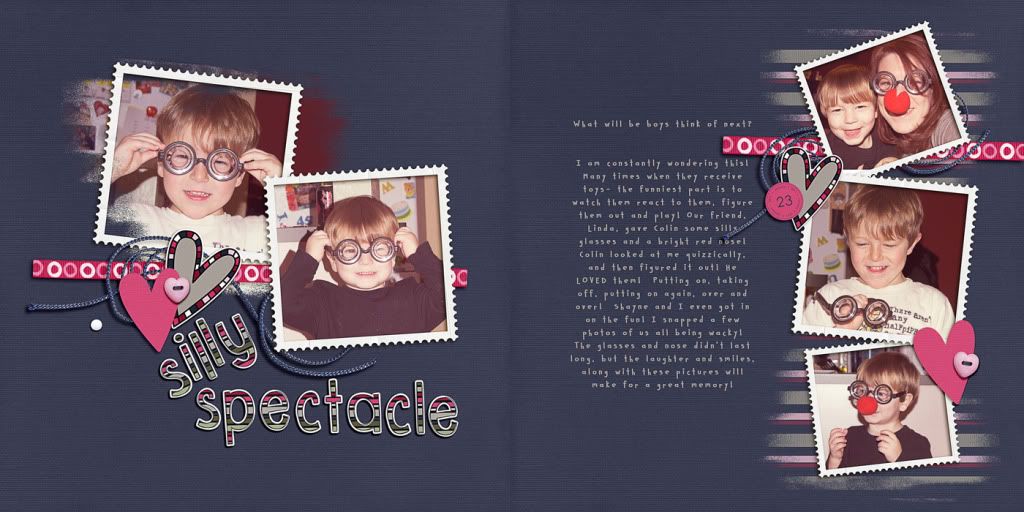
Here is a layout that I made that shows off the versatility of clipping masks and how they can be changed for different looks. In my example, I used Jennifer Labre's Love Me Do (Link:  http://shop.scrapmatters.com/product...tid=7677&cat=6, Happy Scrap Girl's, Blend It Masks 2 (Link: http://shop.scrapmatters.com/product...6&cat=0&page=1) as well as Happy Scrap Girl's Ultimate Date Material (Link: http://shop.scrapmatters.com/product...7&cat=0&page=1. On the Left side of the double, I masked my photo, a nice effect and makes the pictures similar but different. On the right side of the spread, you can see faded stripes under the photos. That is the mask with a paper clipped to it! I adjusted the opacity down, and then changed the blending mode to "Lighten" ti give it a different effect. Such a simple change, and it really makes for fun masking! Try it out!


Fading Gradient Mask:
  1. Open your photo in PSE or PS.
  2. Start a New Document, by Right Clicking and Duplicating your photo in a New or Untitled file. Save.
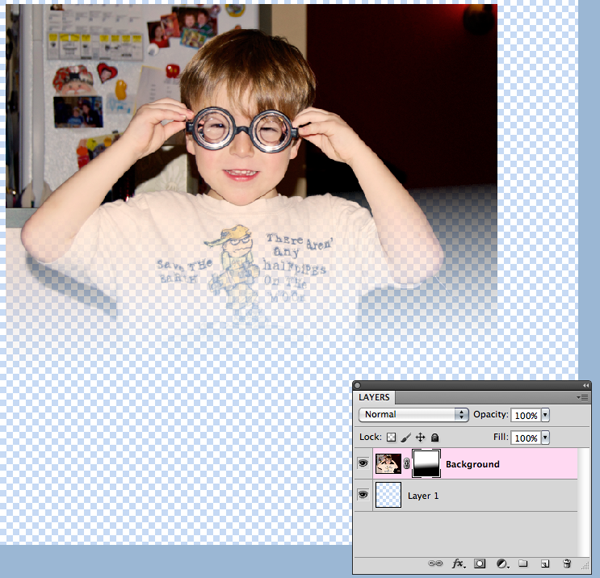
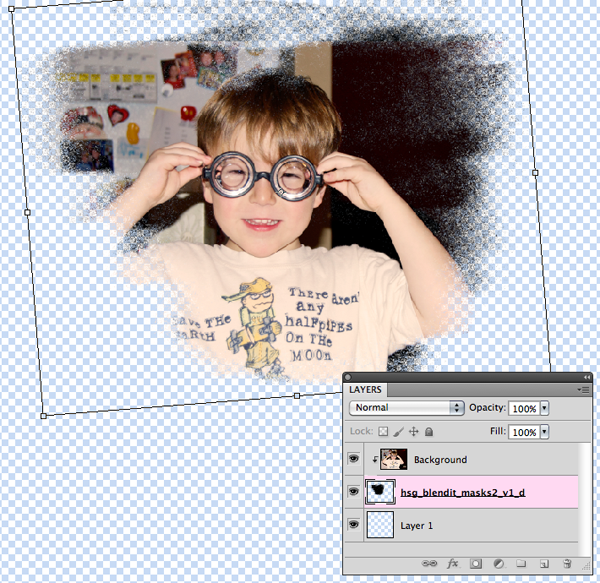
  3. Within the Layers Palette, click on the "Mask" icon at the bottom of the palette. This will add a layer mask, which you can see next to my photo. This fade is essentially a white/black fade mask. White allows the picture to show through, while black will hide the picture. Grey areas will affect how transparent (aka opacity) of the picture.
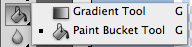
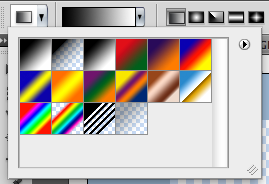
  4. Go to the Toolbars, and use the Gradient Tool.

  5. Click on your layer mask in the Layers Palette, so you know you are going to create your mask in the correct location.
  6. Click on the bottom of your picture in the middle and hold your mouse. Now, drag the cursor upward. Stop where you want the fade to end. Let the mouse button go. A faded layer mask - complete.
Tip: Set your foreground color to black (that is the one on top).
Tip: Hold the Shift key to make your cursor move in a straight line.


Brush Masks:
  1. Open your photo in PSE or PS.
  2. Start a new document by right clicking and duplicating your photo to a new or Untitled file. Save.
  3. Within the Layers Palette, add a new layer. (This new layer should be above your photo).
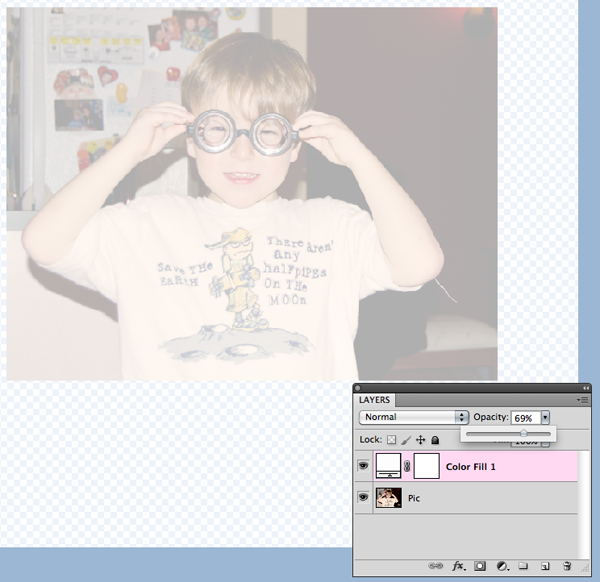
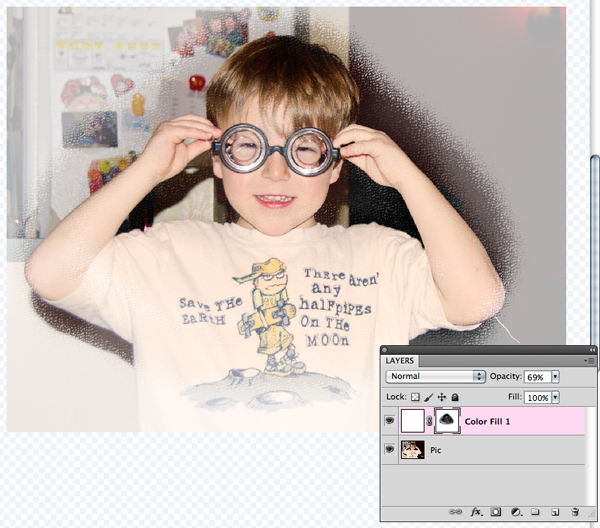
  4. Click on Layer in the Menubar, then choose New Fill Layer. Choose Solid Color, and then OK.
  5. Lower the Fill Layer's opacity until you can see the photo underneath.
  6. Choose the Brush Tool and select a soft, round brush from the menu.
  7. Choose black as the Foreground Color.
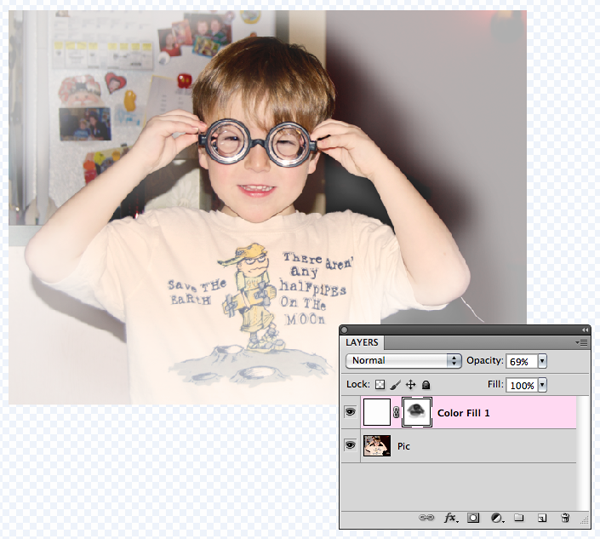
  8. Select the Mask on the Fill Layer -- this is the second square. Start painting in a zig zag or scribbly motion.
Tip: In the above example, you were looking at a white filled layer above your photo. Fill with different colors that may complement your photo. 
Tip: Before Brushing, change the opacity, and try out different amounts.

Texture Tip for Photoshop Users:
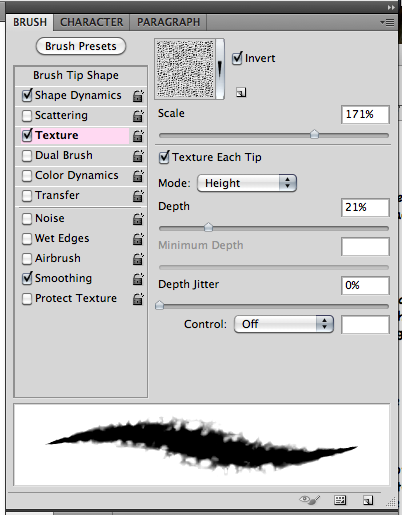
Click on the Brush Palette Tab, then click on the word Texture. Adjust the texture scale and depth to give a slight texture to the brush, according to your taste. Pictured here is Wrinkles texture on default options.Try out different textures and lay with the scales, depths, and Blending Mode to see what you can come up with. 

This image shows a faint change in the texture on the mask. A bit of texture can change up any image. Cool tool! 


Now that you know a little bit more about masking and different techniques, try it out! Remember to duplicate your photos and save the files as you work! Play with the opacity, different blend modes for textures and the color fills. You might just have found a new favorite technique to try on your layouts! Have fun!


I originally created this tutorial for the ScrapMatters Newsletter for February.  Sign up to the ScrapMatters Newsletter (more like a 20 page magazine) and get more tutorials like this, fun freebies, and great articles: HERE!

Thanks for visiting.... 
Jenn (jk703)

Tuesday, February 1, 2011

Day 6 & 7: Happy Pictures and My Movies

Hellllloooooo!  :)  Day 6 of the 30 days of blogging is all about pictures that make me happy!  I've scrapped a whole bunch of those, but my all time subjects are really the ones that make me happy!  My boys - Shayne and Colin!  I love em' to pieces!  They make me laugh, smile, happy and nutty all at the same time!

Here is my album cover for their book for 2011!  So excited...

Big Boys and their Toys by Designs by Kat, Tracie Stroud Designs and Faith True Originals
A Bit Sketchy by Tracie Stroud Designs
Ledger Grids No 9 by Katie Pertiet
Growing Up Brushes and The Story Brushes by Ali Edwards
Of course, DH makes me happy too -- but these little guys make me speechless!  Watching them become little boys and thinking about them growing up puts that little lump in my throat!  I know right now is my favorite time... I wasn't a baby person... so this is when I want to press the pause button!


Movies... Movies... and More Movies...

I am an oddball... I love so many movies... SO MANY!  I am the type of person that can sit and watch movies all day long (and scrap of course!) over and over again!  I am happy sitting around watching all the animated movies with my son... and it doesn't bother me one bit to watch the same movie every day!  I know... odd!  So, right now, the boys are the movie pickers... so we've been watching:

How to Train a Dragon (adorable)
Toy Story 1, 2, and 3 (sniffle)
Bolt
The Incredibles
Cars
Wall-E
Cloudy with a Chance of Meatballs...
Mater's Tall Tales (Dad-Gum....Colin sings this at the top of his lungs, google it! ROFL)
and so many more

My all time favorite movie is The Sound of Music... I know... so not what most people would think of for me... but I love Julie Andrews!  I also love her in Mary Poppins!  I love Men In Black, Volcano, Sixteen Candles, Ferris Bueller, The Day After Tomorrow, and so many more!  Too many to list!

I guess I should do a layout for Fav Movies, lol!

Have a nice night/day -- whichever you are in at the moment!
Jenn (jk703)

Sunday, January 30, 2011

Day 4 & 5: Meet Mom and Dad... and some yummies!

Hi everyone!  Me again... yup... like it would be anyone else... lol... just playing!  I always seem to start my blog posts with Hi Everyone!  Can't help it!  I enjoy blogging, but can't properly start with out that beginning!

Day 4 -- Meet My Folks... ok... I have a couple of layouts that I MUST share!  They mean the world to me, and I wouldn't be who I am if I didn't have them!  Good and Bad... it made me... me!


Geek Chic Scraps -- Thankful For You
Graham Like the Cracker Tuesday Template 10/5
Font is Pea Steele
Geek Chic Scraps -- Thankful For You
Graham Like the Cracker Tuesday Template 10/5
Font is Pea Steele

Day 5 -- MUNCHIES!!!!

MY all time favorite snacky recipe is Pizza Squares... I know it sounds normal... but there is NO sauce?!  lol... Here is the recipe... when I make them next, I will take a pic and post the recipe again...

You will need:
1 10 oz. Refrigerated Pizza Dough
2-3 cups of Shredded Mozzarella Cheese (at least 2)
1-2 oz. Shredded Parmesan Cheese (at least 1)
2 Tbs. Fresh basil Leaves OR 2 Tsp. Dried basil Leaves
2/3 cup Mayonaise (I use the Fat Free, Low Cal one)
2 Garlic Cloves, Pressed
6 Plum Tomatoes (may need more depending on size)

Oven should be set to 375*.
Spray pan with non-stick spray.
Roll out pizza dough onto a 13x9 baking pan.
Press pizza dough toward the edges, try not to make holes like me! (lol!)
Sprinkle about 1 to 1 1/2 cups of the shredded mozzarella cheese all over the pizza crust.
In a separate bowl, combine: 1 to 1 1/2 cups remaining mozzarella cheese, parmesan cheese, mayonnaise, basil, garlic.  Add any other spices you would like...
Mix really well.
Slice and arrange tomatoes in a single layer - covering the pizza dough.
Spoon the cheese mixture onto the tomatoes. (I put some on each tomato, and then in any bare spots).
Bake 20 minutes - or until the top of the cheese is a light brown, bubbly, yummy mess!
Slice into squares with a Pizza Cutter!

EAT!  :)


I love that, and I bring this along with Guacamole to almost EVERY party I go to... I have one more really yummy recipe, but that will be another blog post - just reading it makes you gain 10 pounds!


Hope you've enjoyed your visit... and that you'll come again!
Jenn (jk703)

Wednesday, January 12, 2011

P52: Week 1 Bits


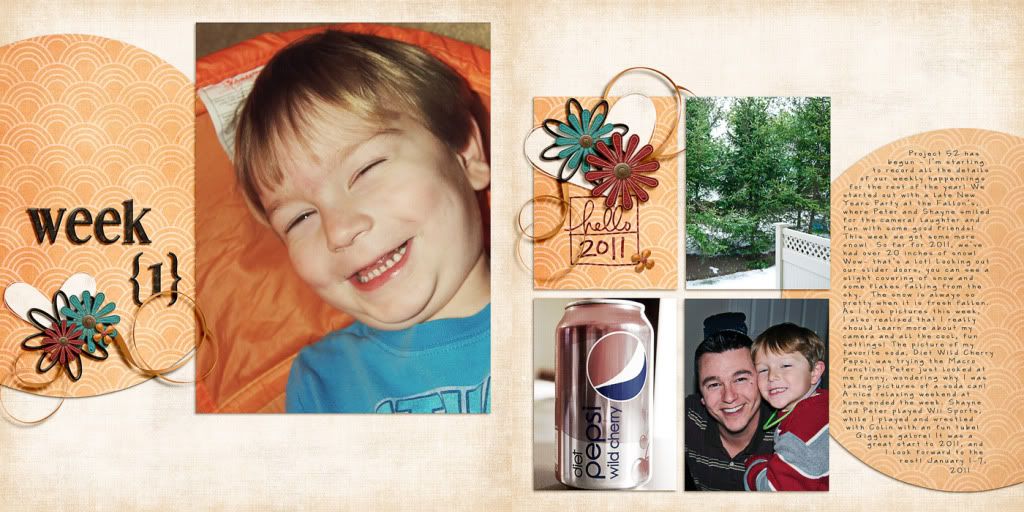
Project 52 has begun - I’m starting to record all the details of our weekly happenings for the rest of the year!  We started out with a late New Years Party at the Fallon’s, where Peter and Shayne smiled for the camera!  Laughter and fun with some good friends!  This week we got some more snow! So far for 2011, we’ve had over 20 inches of snow!  Wow- that’s a lot! Looking out our slider doors, you can see a slight covering of snow and some flakes falling from the sky.  The snow is always so pretty when it is fresh fallen.  As I took pictures this week, I also realized that I really should learn more about my camera and all the cool, fun settings!  The picture of my favorite soda, Diet Wild Cherry Pepsi, was trying the Macro function!  Peter just looked at me funny, wondering why I was taking pictures of a soda can! A nice relaxing weekend at home ended the week. Shayne and Peter played Wii Sports, while I played and wrestled with Colin with an fun tube!  Giggles galore!  It was a great start to 2011, and I look forward to the rest!  January 1-7,2011 

Here is the thumbnail:
Misc. Designers


Page 1:


Page 2:


For this kit, I used Family Reunion by Suzy Q Scraps and Jady Day Studio -- which is an awesome kit that has such rich colors!  I used a fantastic template pack by Fiddle Dee Dee Designs, the Verbosity Album that you can get to help you make your layouts, and it has plenty of room for journaling.  


I'd love to see what you are creating to make your P365 or P52 layouts... so link me up! I've taken some pics this week, but still have a few more days to get through... but I can't wait to do this again!  It is fun to be excited and look forward!  


Happy Wednesday! 
Jenn (jk703)

Wednesday, December 22, 2010

December Goodies! Come take a Peek!

Hi!  Happy Holidays to you and your families!  I'm just popping in to share some of my recent December layouts!  I really, really have to get these all put in a book over the school break, so maybe once I have a book being printed, I can share that link!  


First up is my 2010 Christmas Card!  I just loved it... it took awhile, but I was so happy with it!  My little boys, and me making them giggle so I could get a somewhat decent pic!  It only took me banging a container of M&M's on my head!  Who would have thought!?  I think that someone should have taken a picture of that!


2010 Christmas Card
Supplies Used:  Erica Zane -- A Touch Of Winter(some snowflakes), GG Digital Designs -- Winter WishesFiddle Dee Dee Designs -- Fuss Free: Christmas Greetings and Ali Edwards -- Holiday Word Art.


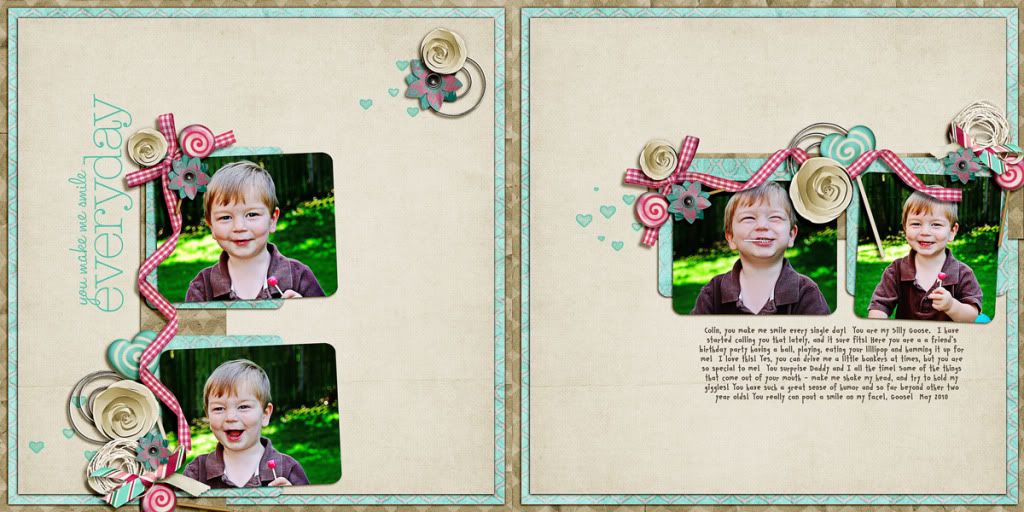
Goose!  
Photobucket


Supplies Used:  Sugar On Top Collab by Spinky Dink Scraps and Project BBlueprints Set 6 by Studio True Blue, Fine Line Page Titles No. 3 by Katie Pertiet, and the font is CK Smile.


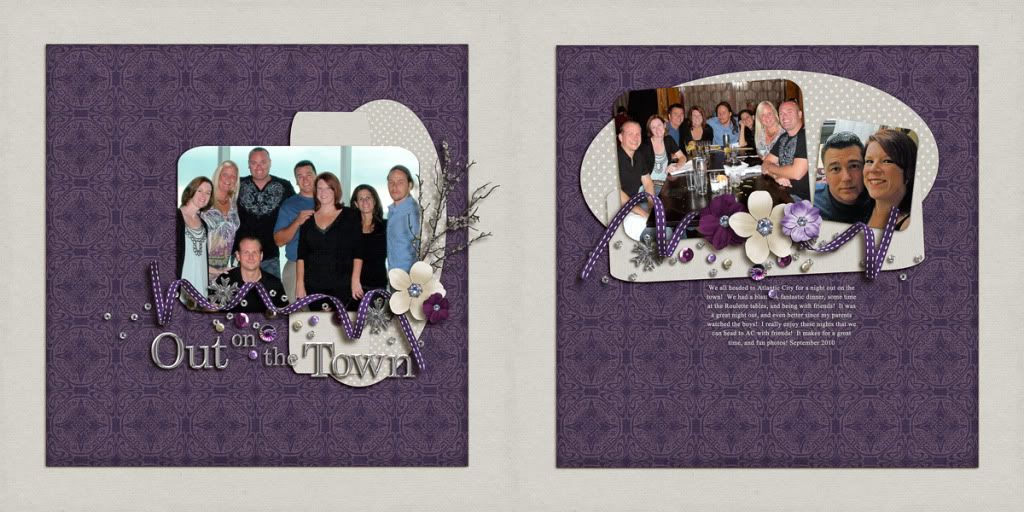
Out on the Town
Night Out Double


Supplies Used:  Winterberry by Jennifer Labre Designs, and the font is Times New Roman.

Thanks for looking and checking out my layouts!  Would love to know what you think?  Trying to improve myself, so Constructive Criticism is welcome!

Have a great day!
Jenn (jk703)

Saturday, November 20, 2010

November 2010 Layouts... I've been busy!!!! :)

Here are some layouts that I created this month!  :p

Using Jennifer Labre Design goodies and Fiddle Dee Dee Shape Templates:
Double Thumbnail... click for the larger two pager:
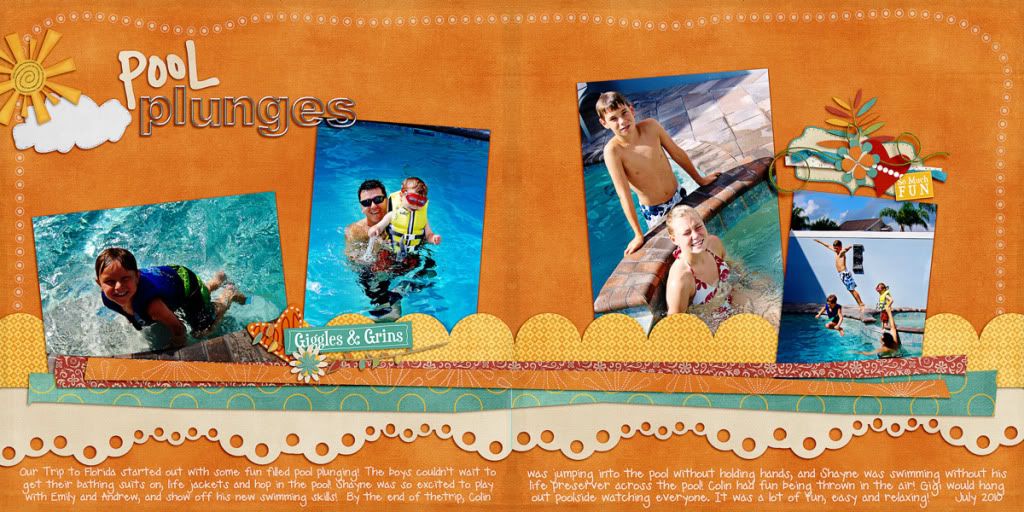
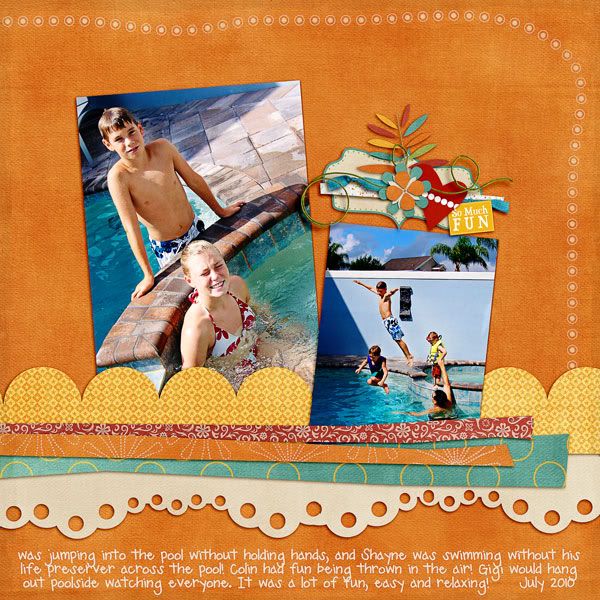
TDC_FDD_Edgers_JLD_Color_PlungeDbl

P1
Photobucket

P2
Photobucket


Using Geek Chic Scraps's Twinkle -- part of the November Daily Digi Files found HERE
Double Thumbnail...click for larger two pager:
Photobucket

P1
Photobucket

P2
Photobucket

Using designs from Tracy Stroud, Designs by Ziska, and Ziggle Designs:
Photobucket

Using Captivated Visions and Stolen Moments, Second Spring:
Double Thumbnail... click for larger two pager:
Photobucket

P1
Photobucket

P2
Photobucket

and last but not least.... using Collab Goodies from Studio Gypsy and Studio True Blue.
Photobucket