
One of the great photography techniques is cross processing. It gives pictures a fun retro feeling that can be gorgeous, different, and striking all at the same time. Before digital photography (in the dark room) film was processed using chemicals. Different types of film needed different sets of chemicals. Slide film needed one set, a different set was needed for black and white, another for color . . . and so on. If you used certain chemicals with a different film, many times the photographs had both a high contrast and a color cast to them. Cross Processing itself is the procedure of deliberately processing film in a chemical solution intended for a different type of film. Although working hands-on with film is not something many digital scrappers do, we can achieve the effect using Photoshop.
The color cast actually looks quite artistic. There are many photographers that have made use of this processing to deliberately create an artistic look to their photographs. The look has become more popular recently because it's found its way into magazine advertising and for artistic wedding photography.
Here is one way to achieve that cross processed look:
Step 1: Open and re-save your photo with a new name. You can always pull the original if you need it. Here is my photo cropped:

Step 2: Duplicate your image using Control/Command J. Then on your duplicated image, run the Image > Auto Contrast.

Step 3: Add a levels adjustment layer by clicking on that button on the bottom of the Layers Palette. It looks like a half white/half black filled circle. Once the levels adjustment layer opens, you will be changing the color and sliders. From the drop down menu, choose Red. There are top sliders and bottom sliders. Now, slide the white triangle on the top slider to approx. 200. The bottom black triangle on the bottom slider should be moved to 200 also. Red is done.


Here is what your photo should look like after this step:

Step 5: Choose the Gradient Tool. Most cross processed photos look as if the light leaked in on one side or in areas of the photo. You can also access this tool by pressing "G."

Step 6: Click on the rectangular gradient on the Tool Options bar. A menu will open. Choose the first one, called Linear Gradient, which is a gradient from the foreground to background color. Press "D" to reset the color palette to the default black and white.

Step 7: Click, drag and release. You will click on one spot on the photo, hold down the mouse button and drag in another direction, and then release the mouse button. Make sure that the Levels Layer in the Layers Palette is active when doing this. Your first click will receive a full level of the adjustment layer, while the dragged areas will receive a gradient of the adjustment.
Play around with this step. Try click, drag and release in a diagonal line, or with a longer drag, and don't forget a really short drag. The look of your picture will turn out differently every time.

Short Drag:

Opposite Drag:

Diagonal Drag

Step 8: When you find the gradient treatment that you like, you can adjust its intensity with the opacity button. On my example, I lowered it to about 67%. Find what appeals to you.

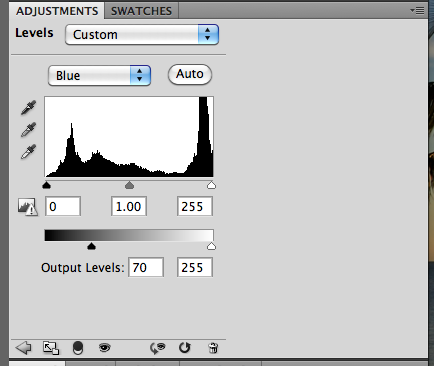
Step 9: Last step... adding a bluish tint to the shadows. This is an option and may give it a more retro, film feel. Add a new adjustment layer, and position it below the original Levels Layer. Choose Blue from the Drop Down Menu and move the black triangle on the bottom slider to about 70 or so.
Here is my final image.

Here is another version where I added a vignette.

I'd love to see some of your photos and how they turned out!
Hope you enjoyed this technique... and thanks for visiting!
Jenn (jk703/The Typative Scrapper)
very fun idea, Jen--TFS!
ReplyDelete