Wednesday, January 12, 2011

P52: Week 1 Bits


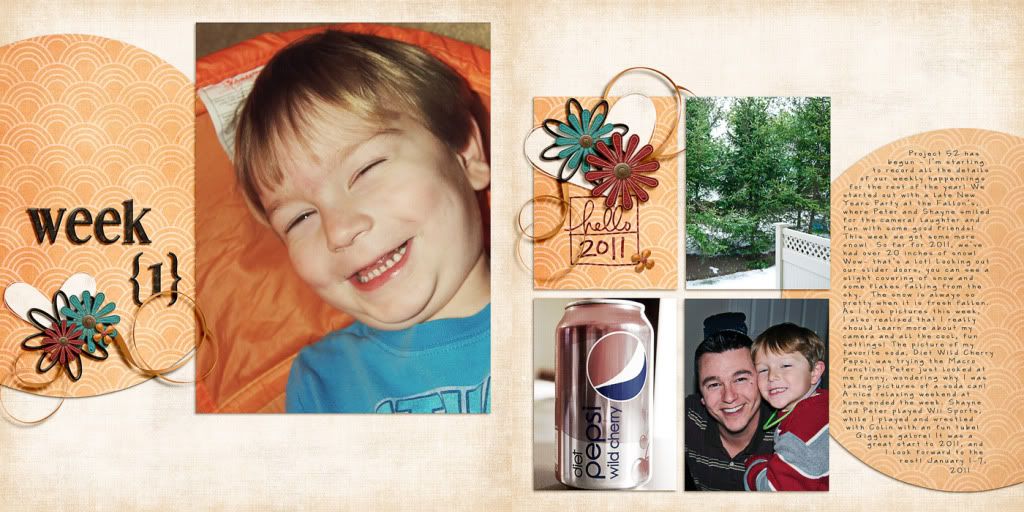
Project 52 has begun - I’m starting to record all the details of our weekly happenings for the rest of the year!  We started out with a late New Years Party at the Fallon’s, where Peter and Shayne smiled for the camera!  Laughter and fun with some good friends!  This week we got some more snow! So far for 2011, we’ve had over 20 inches of snow!  Wow- that’s a lot! Looking out our slider doors, you can see a slight covering of snow and some flakes falling from the sky.  The snow is always so pretty when it is fresh fallen.  As I took pictures this week, I also realized that I really should learn more about my camera and all the cool, fun settings!  The picture of my favorite soda, Diet Wild Cherry Pepsi, was trying the Macro function!  Peter just looked at me funny, wondering why I was taking pictures of a soda can! A nice relaxing weekend at home ended the week. Shayne and Peter played Wii Sports, while I played and wrestled with Colin with an fun tube!  Giggles galore!  It was a great start to 2011, and I look forward to the rest!  January 1-7,2011 

Here is the thumbnail:
Misc. Designers


Page 1:


Page 2:


For this kit, I used Family Reunion by Suzy Q Scraps and Jady Day Studio -- which is an awesome kit that has such rich colors!  I used a fantastic template pack by Fiddle Dee Dee Designs, the Verbosity Album that you can get to help you make your layouts, and it has plenty of room for journaling.  


I'd love to see what you are creating to make your P365 or P52 layouts... so link me up! I've taken some pics this week, but still have a few more days to get through... but I can't wait to do this again!  It is fun to be excited and look forward!  


Happy Wednesday! 
Jenn (jk703)

Friday, January 7, 2011

Tutorial: Easy Peasy Vignette!


Hi Everyone! Another tutorial for Photoshop and Photoshop Elements and the tools!  I hope this one is a bit interesting!  

I had previously focused on the Marquee Tool, and promised to show you how to create a Vignette, PLUS save the Vignette for future use in your scrapbooking projects! Here we go:

First, open a photo that you would like to work with. Then you will now create a new layer above your photo. Next, I chose the new layer, then chose the color I wanted the vignette to be. For this example, I chose white.


I clicked on my paint bucket, and filled in my new layer white. You can pick whatever color you want, by using the eyedropper tool, and moving and adjusting what color spectrum you want to use. You can also pick a color from the photo itself.

After my layer is white, I turn off the visibility of the white layer, my to-be-Vignetted layer!
You should now be looking at your picture again, and your Layers Palette will look like this:


On the toolbar, choose the Elliptical Marquee Tool:


Now, Click in the Top left of your picture and drag to the opposite corner of your picture. You should have an oval of moving ants on your picture. Once you have this, you can nudge and move the oval around to where you would like to Vignette to be placed on your photo. Under the Select Meanu Heading, choose Modify and then choose Feather. You will start with a feather of 30 pixels. You can play around with this number, depending on how much of a vignette you would like.

Now with your To-Be-Vignetted Layer selected, all you have to do is click on Delete. It should remove the selection inside the oval that you created. Your oval should show off the portion of the photo you wanted in the Vignette. Here is mine:


How easy was that?! You can change the shape, the opacity, add a pattern, whatever you want... try using a paper! Here is one with a tan color, and 170 feathering.


One last item... Say you spent a lot of time on your vignette, used different opacity levels, colors, and more... and you want to use it on another photo... You can save it for future use! Just turn off all the layers except the Vignette Layer in the Layers Palette, and Save As. Remember to save as a .png, and where you saved the file to!

Originally created by me for Jennifer Fox Designs: Here!

Thanks for visiting!
Jenn (jk703)

Tuesday, January 4, 2011

Tips! Tips! and More Tips!

Hi Everyone! I have decided to visit you all again -- like I'd visit you anywhere else, lol! --  with some more great time saving tips for Photoshop! I started Digital Scrapping in March 2010 and I've been um... obsessed! I love it! Since I've started to spend time with my software and computer a lot, lol, I decided I needed to learn some useful tips! Through the last few months of using the software, I have learned a few tips that have helped me a lot! I thought I'd share some more of my top tips!

For my layout, I am using Chelle's Creations awesome kit, Choo Choo! It is such a fun, fantastic and versatile kit and definitely not just for train pictures! This is the preview:


Tip #1: Quick Fit
Sometimes, I like to view my whole layout, but I am working too closely. To quickly fit the image you are working on to the screen you are working in -- just click on that little hand 2 times! Presto! Fit to your view!

This is the Hand that I am referring to:

This is what my layout looks like after I double clicked. Perfect fit to my screen, and I can take a quick look see!

Tip #2: Selections are a Drag!
When I create a layout and make a selection, sometimes it is just not in the right location. If you click and drag your cursor using the Marquee Tool, and notice that you are not in the correct area, don't let that mouse button go! Just press the space bar, and then you can drag your selection to the correct location!

My bad selection... (see I didn't get the whole title included):


If you hold that mouse button down, press the space bar, and drag -- you can move it to the correct location you wanted!


Tip #3: Journaling Preview
I pick and choose so many fonts for my journaling that it takes forever! I used to stare at the font, or try it out and then not like it! Well, how about seeing your journaling in every font, and just deciding by looks which one you like!? No more agonizing!

OK, first step is to have the Type Tool your selected Tool. Then click on your journaling to see the dashed box around it, like this:

Next, you will highlight the text that you have written. It will look something similar to this:


Last, you will click on the Character Menu, and locate the font drop down menu. Click inside the Font name, where it says CK Cooper below. Now, just use your arrow keys and scroll through your fonts slowly. Your journaling will change every time you press the arrow key up or down. So easy to preview! You can also change the size and leading as well!


There you go... some more great tips for scrapping quicker! I hope that you've enjoyed these tips, and come back for more! I'd love to hear some of your great tips, so post them in the comments below! Thanks for visiting!

I created this blog post originally for Chelle's Creations: HERE!

Hope to see you visit again soon!
Jenn


Sunday, January 2, 2011

Project 52: Started! Wooties! :)

Hi Everyone!  I've decided that I'm going to give myself a project for 2011!  I was contemplating doing a P365, but that is just a little daunting right now.  I don't really want to set myself up to fail, and want to keep upbeat and excited for my project. So, P52 came about in my mind as the solution!  So, I've made my album cover, and I LOVE it!  


Here is a picture of it, linked to my Gotta Pixel layout:
2011 Album Cover using Spinky Dink Scraps Capture Life Kit and Buttons
I just love this, and originally had the buttons as the words (Stop, Pause and Capture Life - 2011 Rewind), but my brain kicked in that I wanted it a little different!  I asked Lindsay (the awesome Designer behind Spinky Dink Scraps) for some help, and presto chango she agreed!  Woot!  Thanks Lindsay!!!! The buttons were created, and they are FABULOUS!!!!!  My plan is to use some similar items on each page, and these buttons might be perfect!  I guess I need some in more colors and a general neutral set!  LOL!  So that is how I got here -- to my Stop, Pause and Capture Life,  2011 Rewind P52 Album Cover! 


I hope you join me and my weekly quest to create a double page layout for each week!  It will give me a way to showcase some awesome products as well as getting me to scrap my year as it happens!  


SO... do you want to join me in my quest!?  Every week I would like to post on my blog about my week, along with my layouts, and some chattery randomness! Hope you will follow along!  I would like to provide the information to the kits I use, and if I can get permission, give away my pages as quick pages! That will be determined by the designers that I CT for though!  I hope to have a wonderful and completed layout for 2011! If I am able to, I will come back and add an entry for the Album Cover!  So, keep watchin or press that little button and FOLLOW ME! :)


The products I used to create this wonderful album cover are:


Capture Life by Spinky Dink Scraps


Thanks for stopping by to check out my chattery randomness, and see my album cover!  I hope to see you again... and would love if you showed me YOUR albums!  Link me up!  
Have a great night, and a great start to the New Year!  


Jenn
(jk703)


Tuesday, December 28, 2010

Get those KIDS Scrapping!!!

Have you ever been scrapping on your computer and one of your kids asks what you are doing? I have, and it got me thinking about my layouts. They are pages I make to tell my version of the story, but what if my kids had some pages they created with their version of the story? Scrapping with your kids is a little different, and requires a little pre-planning, time, patience, and maybe a yummy snack!!! When my son, Shayne, asked me about scrapping recently, I decided it was a great time for me to make a page with him helping out. Here is a recap of what we did, how we created our page, and some ideas for other layouts!

We sat down and I started pretty slowly. I showed him a group of pictures that I was going to use in the layout, the kit I thought would work with the photos, and some extras for ideas. We selected the background paper, and then the photos. They were of his graduation from Pre-Kindergarten in June, and he loved talking about all the kids in his class, and his favorite teachers. We decided on 2 pictures of him and his friend Carlie. She was in school with him since they were infants and had lived a couple houses away, but recently moved away. I found some frames that we could use and cropped and placed the pictures on the page. After the pictures and background paper were in place, I wanted to move on with all the embellishments. I was using Chelle's Creations "Back 2 School" for the page. Shayne said he really liked the crayons, the chalkboard, the ruler, and the apple. He also picked out a couple of ribbons, and asked about some stars. I started putting the elements on the page and, as I put things on the page, I chatted with him about his school friends. I found some stars, clipped papers to them, and moved them on to the page. Shayne was smiling…actually, beaming!

Our next step was working on the journaling. Since this was our first page together, I wrote a little something, but promised him he could tell me what to type next time. We used the chalk alphabet from the kit and made the title up, 2010 Graduates, and found a great chalk font to use for the journaling. Next, he saw the asterisks in the kit and wanted to add them to the layout. I added them, and the page was complete. I showed him the finished page, and printed it out 8 x 8 so he could see it and show Carlie when we would see them over the weekend! He was so excited, and so proud of his choices. It was fun to see him excited about scrapbooking and hear him explain it to his brother and my husband!

After all was said and done, I did go back and do some tweaking: fixed some typo's, shadows and placement, but otherwise I loved the page that we created together! I realized what I could do differently the next time and how I can help him be even more involved. I also thought about ways to help my younger son, Colin, who is 2, be involved in a page. Here are some ideas that may help you get your kids involved, or creating, with you.


Credits: All by Chelle's Creations
Back 2 School: http://shop.scrapmatters.com/product...cat=207&page=3
Round The Block: http://shop.scrapmatters.com/round-the-block.html
Doodley-Do Combination: http://shop.scrapmatters.com/doodley-do-combo.html
Font - Chalkduster


Little Ones - get younger kids involved by having them:
-Choose colors, background papers, and order of layers
-Pick out the embellishments - stars, circles, ribbon, flowers, etc.
-Have them draw a picture, scan it in and make a page of their drawing. Consider writing their word-for-word description or story about the picture, complete with mispronunciations!
-Create an A-B-C book, a 1-2-3 book, or a Color book - use their choices (a is for alligator, or is it for airplane? Depends on the child!). 

School Age Kids - get bigger kids involved by having them:
-Choose the photos to scrap. 
-Select the kit(s) to use with the photos. 
-Pick out embellishments and fonts - mix and match from a variety of kits.
-Work on their computer/mouse skills by placing papers or embellishments.
-Create an embellishment of their own to add on after printing, or scan one in.
-Journal with more details. 
-Use their own handwriting for the journaling, or print the page, and write the journaling on a paper strip to add onto the page. 

Teens - get teens involved by having them:
-Practice more in-depth computer skills. 
-Learn additional software functions and tricks.
-Design entire layouts. 
-Select and experiment with photo treatments. 
-Journaling - and add meaningful quotes, lyrics, or poems. 

Ideas for Pages
Favorite Stories/Books, Colors, Numbers, Stuffed Animals, TV Show, Songs, or Movies.
School Happenings, Projects, Reports, Grades (Good and Bad), Dances, Sports Games, and Classes.
Friends and Family, Brothers, Sisters, Extended Family, BFFs, and Pets.
Holidays and Birthdays
About Them - Top 5's, Chores, Routine, Thoughts, Good vs. Bad, Fears, Dreams

Scrapbooking with kids is a way for you to document the everyday happenings, lives, and thoughts of your children. The photos and stories will often be shared with family and friends, but you also shared the moment of making of the page with your child. When Shayne actually had his page, he wanted to run and show off what he helped create. It is another outlet of creativity that he can share with others! All ages can get involved and learn that sharing our stories now and doing it together will be a lot of fun. We might just become a little closer while creating! And as an added benefit, scrapbooking with kids gets them involved and possibly happier when you want to take "just a couple more" pictures!

One more time-saving tidbit…
For many people, there are more than one child in the family. I always want to create pages for both of my kids. After you and one of your kids create a page -- "Recycle The Page". When you make a page with one child, duplicate it. Make a few small changes, maybe to the colors, font, title or recoloring of elements, as well as changing out the photo - you can use this page for another child! Family layouts may only need a change in journaling to make it more personal to each child's perspective. Nice and Easy!


This article was created originally by me for the ScrapMatters Newsletter, in the October 2010 edition.  You can sign up: Here!You can get great articles like this one every month!  


Have a great day and thanks for stopping by!  
Jenn
(jk703)