Sunday, November 28, 2010

Tutorial: Removing a Background

Hi Everyone!  I'm here today to share how to do a quick removal of a photo's background!  So bear with me and all the red that you will see shortly!  I sure should remember to change the mask color in Photoshop soon!  Goodness...

Anyway... Here is where we start! First, open the photo that you want to remove the background on.  Here is mine of my little boy, Colin!


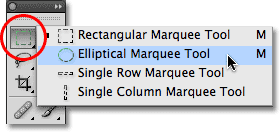
Once you choose the Magnetic Tool, you should start clicking around the image that you want to stay, and the background behind will be removed. For my example, I am clicking around Colin's body, and moving around his clothes.  (Sorry, my screen capture below also captured me getting my selection, so I have a few extra magnetic tool squares, lol!):


Once you have clicked all the way around, you will get those fabulous marching ants... now -- who would have thought ants could be fantastic!  Once you are at this point, this is what you should see:


You can see though, in the image above, Colin's treasured stick was not fully captured.  So... if you press Q on your keyboard you will be brought into mask mode.  This allows you to easily make changes to the image and what is or isn't included within your marching ants.  Painting with white removes the ruby red mask, and painting in black adds ruby red to the mask. I need to remove the mask on the stick, so I am painting with white.  


Here is my full mask after I zoomed in and re-captured the stick in his hand. Looks funny right... I know... lol!  Now when you do this, you can go around to all the edges and be as specific as you like.


After you have completed mask edit, you can soften the edges by adding a slight Gaussian Blur to the image.  Still in the mask mode, click on Filter > Blur > Gaussian Blur.  Bring the blur down to .5 pixels just to soften the edges.  It is up to you how much you want to use, so play around until you find what you like!


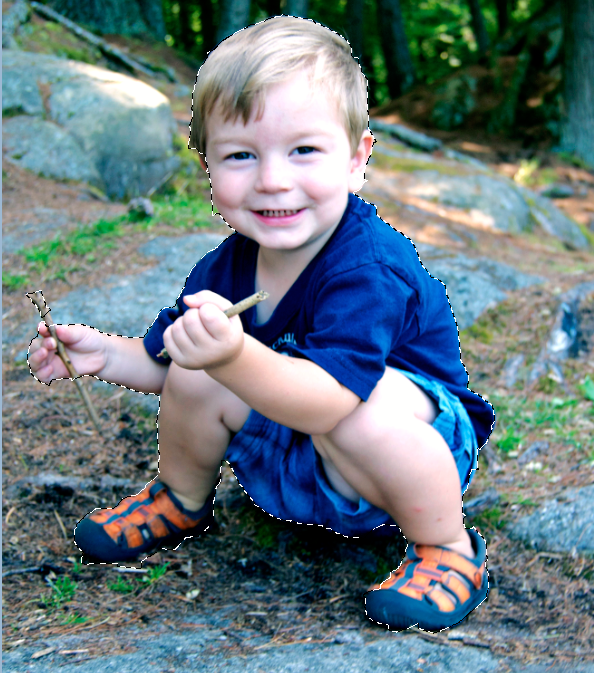
Click ok, and the blur is set.  Next press Q to quickly get out of the Mask Mode.  You will see your image with the marching ants again.  Making sure your photo is selected, all you have to do is hit delete on your keyboard and the background will be removed to the clear pixel view.  Now, just add papers, put your image in a layout or you could blend it into the paper... so many ideas!  Here is Colin, removed from the woods!


Hope you enjoyed a quick way to remove a background from a photo!  You never know what you might catch behind your subject, it might be good to know how to remove it!  LOL!

The post was completed for Jennifer Fox Designs: Here!

Have a great day!
Jenn
(jk703)

Tuesday, November 23, 2010

Double Smouble You Say?!

Hi Everyone!  I'm back to ramble a bit for you! 
I am sure you are as obsessed as I am about Digi scappin?!  I am, and I only really started this past March 2010!  I have sure learned a lot!  I started out as a paper scrapper, and card maker, and then had kids!  No time to scrap and no time to clean happened... I'm sure some of you were in the same predicament!  

Anyhooo.... I decided to try digital, and then started wondering why it was bothering me a bit!?  I figured it out... I am a traditional scrapper at heart, and love the look of paper pages, as well, and layouts!  By layout, I mean the double layout!  

I learned that I like to make double layouts and I think in the long run it will work nicely when I get to printing that book I've been working on!  I thought I would just share a  fun tip from when I scrap my double layouts! 
I make my layout 24 x 12 and then I have a couple of guides set up at the 1/2 mark on the edge of the pages!  I use guides so I don't always have to wonder if something is going to get cut off in the printing process later on down the road. It looks like this:


The above picture is missing the middle guides at 11.5 and 12.5 on the inner edges.  Sorry about that!

When I make a double layout, I first start with my paper stacking, and then move upward in the layers area!  
BUT, I do tend to work on one side heavily with layers, clusters, placement and shadows! That first page is closer to finished than the other, but also saves me loads of time.  By doing this, I can then copy and paste many of the elements I like on page 1 side onto the side of page 2.  I can also group various layers, and duplicate them! Then when adding to the other side, flip or twist it in a way so it looks different!  BY doing this, I'm saving time not having to re-seize, shadow, or even some clustering!  

I also tend to save my layouts as double layouts.  I don't save each side individually.  I figure that if I need to make changes, it is easier to locate both pages together!  Also, I plan on shrinking my layouts (that is everything BUT the Background) by 10% before uploading to make sure nothing gets cut off when printed!  Just an idea!

Another time saving tip for me is templates!  I am a big fan, and I use them tons!  But how do you use a template for a double layout?  Well, if I use it as is for the first page, and I want something similar, then for the second flip it, mirror it, or just use something from it as a starting point, and mix it up to make that second page!  Many of my paper layouts were mirror images in terms of design... it just changed with what was actually included on the page!  

And remember to trim the excess of your files to save space!
Post created by me, and posted at Geek Chic Scraps: Here!

An example of my recent Double Layout:


Click on the Double for a Larger Version:


Captivated Visions -- It's About Him Kit
GG Digital Designs -- Clip Its 2
Font is Creative Block BB

Thanks for stopping by, checking thing out, and reading up!  I hope you all (who celebrate) have a great Thanksgiving!

Jenn
(jk703)

Saturday, November 20, 2010

November 2010 Layouts... I've been busy!!!! :)

Here are some layouts that I created this month!  :p

Using Jennifer Labre Design goodies and Fiddle Dee Dee Shape Templates:
Double Thumbnail... click for the larger two pager:
TDC_FDD_Edgers_JLD_Color_PlungeDbl

P1
Photobucket

P2
Photobucket


Using Geek Chic Scraps's Twinkle -- part of the November Daily Digi Files found HERE
Double Thumbnail...click for larger two pager:
Photobucket

P1
Photobucket

P2
Photobucket

Using designs from Tracy Stroud, Designs by Ziska, and Ziggle Designs:
Photobucket

Using Captivated Visions and Stolen Moments, Second Spring:
Double Thumbnail... click for larger two pager:
Photobucket

P1
Photobucket

P2
Photobucket

and last but not least.... using Collab Goodies from Studio Gypsy and Studio True Blue.
Photobucket

Tuesday, November 16, 2010

Yummiest Treats!

Hi Everyone! 

I'm bringing you a few of my favorite Yummies Today! Woo Hoo!  I thought I would share some info for some fun desserts!

First, is the fantastic and popular: Bakerella! This site is full of ideas... cakes, pops, and great ideas! Boy, I wish I had an ounce of her talent! Here are a few pics from her blog:

Her new book coming out soon (which I want to get!):

and some here are her so pretty to eat, but I would eat them! Cake Bites (her Cake Pops look just like these, but on a stick, various kinds):
YUM, right?!


A great resource for recipes and yummy desserts is Nosh With Me: Easy to follow recipes, pictures and ideas! Great Blog! Here is a pic of her S'mores recipe that looks perfect without the fire!


As the ending... my all-time favorite is : Hello, Cupcake! This is a website, as well as a blog that showcases what you can make with cupcakes, icing, and candy! Check it out! I made a few of the recipes from their first book named: Hello, Cupcake! (lol):


They have a second book that is out now, called "What's New, Cupcake?" I will have to head out and check that one out for some great new ideas!!! Check these out -- Spagetti and Meatballs!! Hello, Cupcake! Style...
Here are pics from my own creations using their book... so you know they CAN be done! Some (Fun to Make) Bugs:

One of the (Really Pretty in Person) Sunflowers:

Here is one of MY favorites... just cause I created it! lol! My very Own Cookie Monster Look A Like:


Well, I hope you've enjoyed these blogs, photos, and tidbits! I am pretty sure that I might be leaving you hungry! Would love to see your edible creations, so share any that you've made in the comments!!! Have a great day!

Post Originally created by me for Jennifer Fox Designs: Here!

Jenn (jk703)

Sunday, November 14, 2010

The Marquee Tool

The Marquee Tool

Hi Everyone... I'm just starting to add my previous blog posting of tutorial and tips for Photoshop and Photoshop Elements.  This was one of my first ones.  I hope you enjoy reading about the tools that you may work with when scrapping away!  

First, the marquee tool is on the tool bar and looks like this:


The Marquee Tool can be accessed by the shortcut Command + M or Control + M. At the most basic function, the Marquee tool is used for cutting, cropping and copying selections. As in the image above, there are 4 different ways to make selections: Rectangular, Elliptical, Single Ron or Single Column. The single Column or Single Row measurement is in pixels. Right now, you think you can only create selections using Rectangles and Ovals! Wait... we can fix that!

In your Photoshop Preferences selections menu, check off the Use Shift Key for Tool Switch option. This will allow you to create squares and perfect circles. When making your selection using the Rectangular Marquee, and holding down the shift, you will create a square selection. the same goes for the Elliptical marquee and circles.


There are times when you make a selection, and realize that it is not in the right location. Do you know how to move the selection? Here is how; hold dowm the space bar, and then begin to drag your mouse. Your selection will move and not re-size.

Now I will go over the marquee Options Toolbar. This will give you some knowledge of what all those little icons up on the top mean! And you thought they were decoration! HA! The toolbar option looks like this:


This bar allows you to make changes to the Marquee tool you are using, whether Rectangular or Elliptical. Those for funny square type shapes have meanings too! The first is called the New Selection Button. this allows you to make a new selection and delete the current selection.
The second small button is called the Add To Button. This option allows you to add to an existing selection. When you are making an additional selection you can also get to the Add On Option by pressing and holding the shift key while you are making the new added selection.

Subtracting from a selection is able to be completed by choosing the 3rd small button, and works in the same was as the Adding to the selection button. This button can be used by pressing the Alt Key on your keyboard, or for a Mac, the Option Key, and again this must be while you are making your selection.
Last but not least is the Intersection Button. This option can be used when you want to have an intersection area within the existing selections. By pressing and holding the Shift and Alt together (Shift and Option for Mac) you can do this while making your selection!

That is a lot to see and understand... lemme know if you have questions!

Have a great day everyone and thanks for stopping by! 
Jenn (jk703)

Thursday, November 11, 2010

ACTION!

Hi Everyone! 

 I am so excited to be here and be able to share one of my most favorite websites!  Now, I know we all love and obsess over our digital scrapbooking pages, but we can't forget our photos!  They are the reason we show off our pages and how we capture the moments to remember! 
So without further ado... my favorite photography website is:  MCP Actions!


MCP Actions is my home for any actions and photo treatments that I use for my layouts! They are awesome!  There are so many you can choose from, and a few freebies that the owner, Jodie Friedman, gives away on the site!  Some will cost you some moola, but in my own personal opinion, they are so worth it!  They can really change the picture, and make it so much more than what I had to start with!  Plus, any operator related photo problem seems to be fixable when I use the various actions! 

Here is the link to all of her freebies:  Free Actions.  There are many for Photoshop, but a lot for Phostoshop Elements too!  My most favorite freebie is the - The Take Action on Cancer Awareness Action:


It can really dress up your photo or change the tone of the pictures to match your layouts!  Perfect coloring and completely able  Here is a direct click:  Free MCP Action for Cancer Awareness.  This set is so cool... and I used it on my layout with the most recent kit:  Book Worm!  Here is a thumbnail to my layout, just click it to make it a little bigger:  

GC Bookworm

I use a product from MCP that goes by the name of :  All in the Details!  This fab set really has a lot to offer, and then when you mix actions and more actions.... you have so many possibilities!  It really can help in making the best photos for your memories! 

Hope you enjoyed this post with me!  I enjoyed sharing one of my favorites with you! Leave a comment and link to your MCP Photo Actions; I would love to see them! 

I originally created this blog post for Geek Chic Scraps:  Here!

Happy Photo Fixes!

A Recent Layouts!

Here is a recent layout that I loved.  I just loved the coloring, the scatters, and an actually somewhat ok picture of us!  All are linked to a designer's gallery for all credits!  Thanks for looking!

Using Spinky Dinks Scraps - Take a Chance, and Fiddle Dee Dee Designs (with Wm[Squared] -- DSD Collaboration.  Specifically, this template was from the Don't Box Me In collection.

Open Your Heart To Love 
Thanks for looking, and I'll be adding more and more!  I already have a whole bunch of layouts to share, I just can't type fast enough! (and I do have to get some sleep!)

Have a great night!
Jenn (jk703)

Monday, November 8, 2010

The Move Tool

Hi Everyone! 

A blog post about our wonderful tools that we have in Photoshop and Photoshop Elements, the Move Tool!  

This week's topic for tools is the Move Tool! I know, I know... you are thinking "The Move Tool?!" I know it isn't physics, or rocket science, but we have to start somewhere, right?! The Move Tool is the most basic tool, and there are some hidden secrets! Let's see if I can show you something that you didn't know!

The Tools:


The move tool is at the top of the tools toolbar and looks like a triangle and a small arrow that points to the left. I actually learned a few tricks about the Move tool that I thought I would share! Some are basic... but keep reading! Click on the Move tool, or you can also get there by hitting "V" for the keyboard short cut and we are off...


You can move entire layers. If you first click on the layer (within the layers palette) to activate it. Then click onto the canvas and move the layer around as you would like or simply nudge it here and there using the arrow keys. A nudge is a a single pixel move in the direction of the arrow you choose. By pressing the shift key and the arrow, your nudge becomes a 10 pixel nudge!

To make copies of any image on layer, press and hold Alt key and drag the image with move tool. This action duplicates the image by creating new layer over original image layer.

To copy an object in a straight line, click and drag the object while holding down the Shift and Control (Command on a Mac) keys together. The element will be copied and the copy placed in a line either vertically or horizontally from the original element.

To find center point of any image, select move tool and check the move tool option "Show Transform Controls" on option bar above.

You can use the Move Tool temporarily while you are using most of the other tools - just by holding down the Control Key (Command on a Mac).


The option to Automatically choose the Selection is very handy. By checking this item, it allows a selection that is clicked on within the canvas to be moved. The corresponding layer in the layers palette will also be highlighted and selected.


The option to Show the bounding Box is important to me! By choosing this option, a 9 point box will show up around your selection. By choosing one of those nine points, you can click and drag to enlarge or shrink the selection. In the center of your selection is a round point, by clicking and dragging this, you can skew the selection.


When the Bounding Box is selected and you press the Control + T (Command + T on a Mac) the move tool will then change to the the Transform Command.


To quickly change the opacity of a layer quickly while you are using the move tool, type the percentage opacity you want the layer to be. Typing an 8 will change the opacity to 80%, typing 1 plus a 5 will change it to 15% but to change the opacity to 100%, you can just type a zero.


In the top of the bar that shows the Move Tools, within the sub tools, you should see this tool menu or something similar:

This part of the Move tool can be really, really useful! Aligning two layers together is all well and good, but we often find we want to align something to a specific layer. For instance, you might want to center a layer horizontally within another layer, or centering a frame on to a cropped background paper. Here's how:
  1. Control (or command) click on the icon in your layers palette. This makes the marching ants march around that particular selection.
  2. Select the layer you want to move. If you want to align more than one layer, link those layers to the selected layer:
  3. Here is the two step click to center:
Click on this icon:
Then click on this icon:


Presto chango.... your selection is centered on the specific layer you chose! How cool is that?!?!. Now I hope that you have learned something in the above that might be useful and you enjoyed my rambling!

Previously blogged this tutorial for Jennifer Fox Designs here: Here!

Have a great day everyone!
Jenn (jk703)

My First Post...

Ok..... Ok... Here goes!  I am starting a blog!  I need to have a place to show off my digiscrappin goodies and layouts!  I am going to also post all the tutorials that I create as well as any articles, tips, recipes or chattery mish mosh that I post all around digi land!  So to start off... I have a few layout to show you!

But first... a layout that inspired me to actually keep a record of my ramblings... silly, happy, sad, and of course random!  


This layout was for Fiddle Dee Dee Designs, and the Artisan Notebook for November 2010!  I used Jennifer Fox Design's Rought and Tumble to complete my layout!  It was also my first non-photo, heavy journaling layout! I like to type and chat, but journaling is difficult!  


And there you have it... my first quick blog post!  I'm now going to try to upload a bunch of layouts as well as any tutorials or tips that I have blogged about (for my designers!)


Have a great day!
Jenn (jk703)